What is IoT?
IoT Stands for Internet of Things, which is a network of internet-connected hardware devices that give some insightful information about things such as a car, bike, truck, factory, etc.What is the use of IoT?
You might have heard the word digital and smart multiple times such as digital services or smart cities etc. A real-world example is Indian prime minister Narendra Modi who always talks about digital India and smart cities.
So, what does digital mean? Simply the access of the services to an individual over the internet in the form of web applications, mobile applications, etc. which helps to minimize the presence of humans at particular facilities in order to get work done from the location where the person resides with the help of mobile apps or web applications.
A smart city is also a part of a digital service in which citizens can see the temperature and humidity of their cities and it automatically generates alerts to their citizens regarding sudden changes in the environment and specific precautions to take. Citizens can even track the live location of specific bus routes so he or she can plan accordingly. Streetlight management is another example of a smart city service in which streetlights are automatically managed by a digital service that is responsible for turning on or off lights based on surrounding visibility and generates alerts if any light bulb has a problem, so servicemen can fix it immediately.
Benefits of IoTConsider just one of the scenarios which I have explained in the preceding paragraphs, let’s assume we have implemented smart streetlight management using IoT, the benefits are:
- Monitor the network of streetlights at one place using the web application or mobile application.
- Turn the lights on or off automatically based on the surrounding visibility such as sunrise and sunset which help to save a huge amount of electricity consumption.
- Consider some lights are turned off due to some problem, then IoT generates an alert with details which helps servicemen to fix it immediately without going in person at sites.
How IoT works
To understand how IoT works, understand the following basic terminology of IoT:- Things
- Device
- Sensor
- Network
- IoT Gateway
- Communication Protocol
Examples
- Temperature and humidity sensor
- Pressure sensor
- Visibility sensor
- Magnetometer sensor
- Accelerometer sensor
The communication protocols are the medium that is responsible to establish the communication between IoT devices and IoT gateways to send and receive the messages between them.
Examples of the most common protocols are:
- AMQP
- MQTT
- Https
- TCP
- UDP
- DDS
- XMPP
- LwM2M
- ZigBee
- AMQP
- AMQP Over WebSockets
- MQTT
- MQTT Over WebSockets
- HTTPS
What is Microsoft Azure IoT?
Azure IoT is the IoT gateway for IoT devices which allows bi-directional communication between IoT devices to cloud and cloud to IoT devices. Azure IoT can process the millions of IoT devices and route the messages to specific data storage platforms.Key Advantages of Azure IoT
- Built-in UI to manage and monitor the IoT devices
- Allows us to capture entire device lifecycle events using the device life cycle change event feature
- Allows us to upgrade the firmware of single or bulk of devices using the automatic device management feature
- Allows the bi-directional communication between IoT devices to cloud and cloud to IoT devices
- IoT hub allows us to connect the edge devices and IoT devices its means IoT hub capable to connect low powered and high processing devices
- IoT devices can send telemetry data as well as can connect devices over a network using AMQP, MQTT, and HTTPS protocol to the Azure IoT hub
- Azure IoT hub supports the wide range of IoT device authentication mechanisms such as X509, tpm, and symmetric key
- Azure IoT hub allows routing the messages to the specific data store and data process platform using the message routing feature
- Azure IoT hub allows uploading the file for a specific device which can be used for device upgradation for storing device process-related information
- Azure IoT hub IoT Hub allows us to send commands to the device which can help to change the behavior of the device using the Cloud to Device message feature
- Provides the device twin feature to store the metadata or any specific information about the IoT devices
- Azure IoT hub is supposed to be a secure platform for communication and authentication for the devices with the help of communication protocol AMQP, MQTT and HTTPS and authentication mechanisms such as X509, TPM, and symmetric key
- Provides the wide range of SDK which help to connect to the IoT hub and devices programmatically C#, java, python, C, Node.js, android SDK also IoT hub supports api
- Provides the feature to enable or disable the connected IoT devices
Azure IoT Hub can be created using:
- Azure CLI
- SDK
- API
- ARM
- Azure portal
Prerequisites
Step 1: Go to the Azure Portal
Step 2: Create Azure IoT
Find the create resource option which can be found on the left top side of the portal as shown in the following image or follow any other option which you may know to create the resource (service) in the Azure portal:Provide required details as shown in the preceding image:
- Subscription: Choose the available azure subscription which you want to use for creating service from drop-down list
- Resource Group: Choose an existing resource group or create a new resource group that you may want to use.
- Region: Choose the deployment location for IoT hub device provisioning from the given list. However, the device provisioning service is global and associated with any specific location, but you must specify a location for the resource group where the metadata associated with the service profile will reside.
- IoT Hub Name: Name of the IoT hub service which must contain only alphanumeric characters or a hyphen.
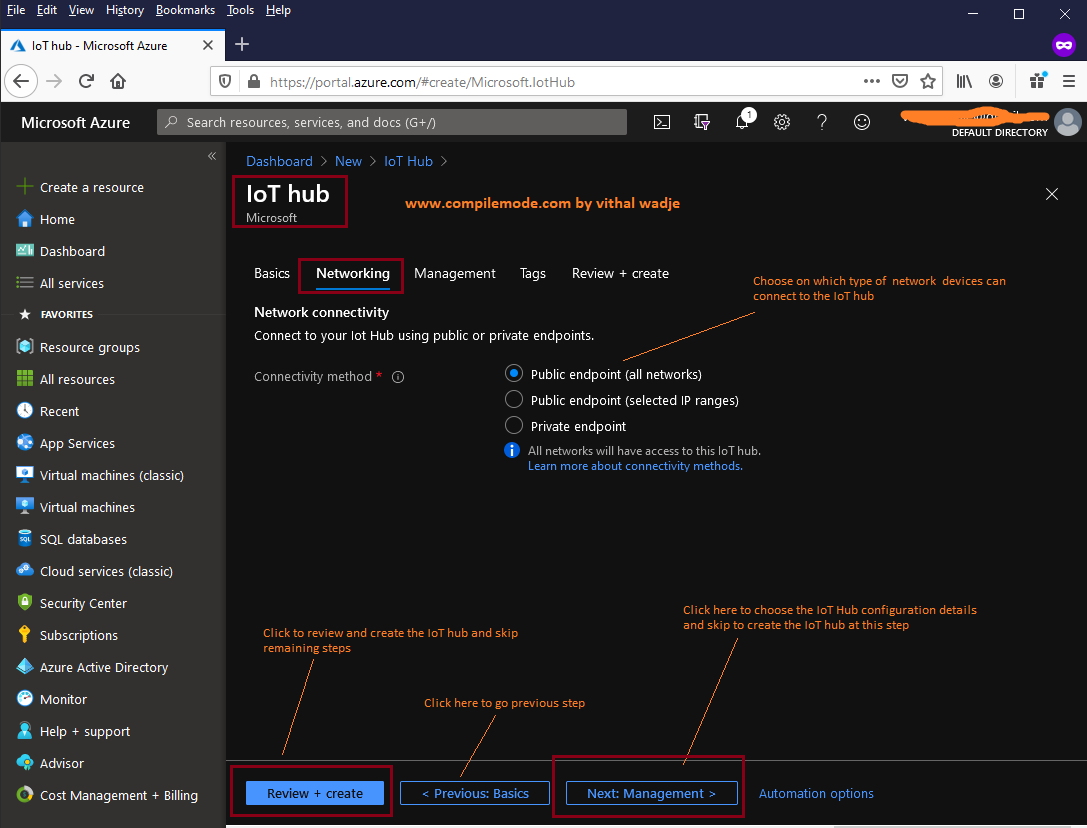
In the above image, we choose the connectivity method for the IoT hub which decides which network the devices can connect to the IoT hub, there are three methods:
- Public Endpoint all Network
- Public Endpoint selected IP addresses
- Private Endpoint
Public Endpoint all Network
This option allows us to connect devices to the IoT hub on all public networks for whoever has access to public URI and the required credentials.Public Endpoint selected IP addresses
Even you have a public endpoint (URI) but want to restrict devices, you should connect from a specific IP address. Then you can define the range of IP addresses. The IoT hub allows you to connect only to devices that fall within the defined IP address range. This option gives the useful feature to allow only known networks to connect to the devicesPrivate Endpoint
Once you choose your intended connectivity method, click on the next step which shows the step to configure the scalability of the IoT hub as:
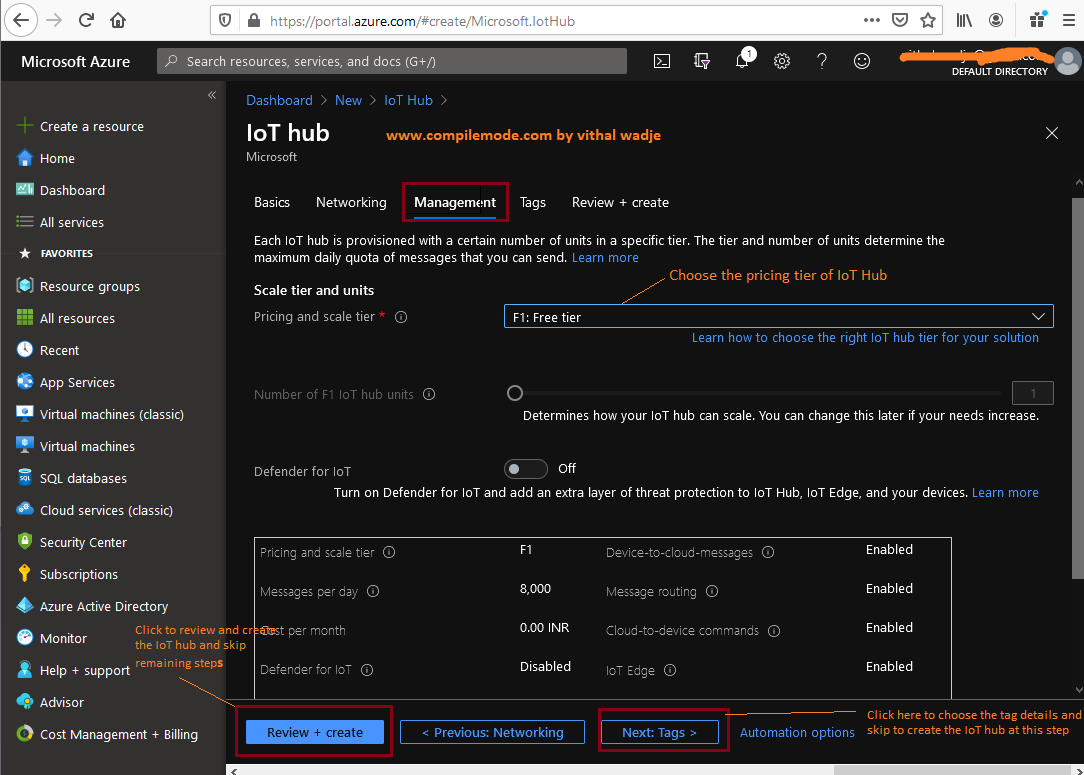
The preceding management step allows us to define the scalability and security of the IoT hub with the help of the following options:
- Pricing and Scale Tier
- IoT Hub Units
- Defender
Free Tier
Basic Tier
- B1
- B2
- B3
Standard Tier
- S1
- S2
- S3
- Overview
- Certificates
- Built-in Endpoints
- Query Explorer
- IoT Devices
- Automatic Device Management
- Messaging
- Security
- Monitoring
Built-in Endpoints
Query Explorer
IoT Devices
Automatic Device Management
Messaging
Security
Monitoring
I hope this article was useful for understanding the basics of the Azure IoT hub service. In this series of Azure IoT, next, we will learn about the device enrollments using Azure IoT hub device provisioning service.


Post a Comment