Inserting Data into Cosmos DB Using ASP.NET Core API

In this article, we will learn how to insert the data into the Azure Cosmos DB with SQL API using the ASP.NET Core API. Let's learn step by step.

Step 1: Set up Prerequisites

To perfrom the insert  operation in the Azure Cosmos DB we are required the following one the of the Prerequisites.

  • Azure Subscription OR
  • Azure Cosmos DB Emulator 

Azure Subscription 

To create the Azure cloud Cosmos DB account, you need an active Azure subscription. When you create the Cosmos DB account on the cloud, the Azure Cosmos DB Serverless account provides the first 1000 RU and 25 GB of storage for free per subscription.

Refer to the following link to learn the basics and how to create the Azure Cosmos DB account.

Azure Cosmos DB Emulator (offline)

As explained, the first approach requires an active Azure subscription as well as an active internet connection, which is not feasible for everyone who just wants to explore or learn about the Azure Cosmos DB.

To overcome the preceding issue, we can use the Azure Cosmos DB capabilities and features using the Azure Cosmos DB Emulator without an active Azure subscription or an active internet connection.

The Azure Cosmos DB Emulator currently does not have support for all the NoSQL API's, but it will support the most commonly used NoSQL API's such as the SQL API and Mongo DB API, and in the future it may also support all the Cosmos DB API's.

The following is the link to download the Azure Cosmos DB Emulator.

After clicking on the link, the official Microsoft documentation website gets opened, from which you can find and install the latest version of the Azure Cosmos DB Emulator.

Step 2: Create Azure Cosmos DB 

In this article, we are going to use the Azure Cosmos DB emulator instead of a Cloud Azure Cosmos DB account. If you are a beginner, then please refer to the following articles to learn how to create an Azure Cosmos DB account.
We are using the Azure Cosmos DB emulator in this article. search for the Azure Cosmos DB emulator from the search bar of the window once you download and install the emulator, which looks like the following:


The preceding image shows the Azure CosmosDB Account of the emulator, which will provide the same features as the Cloud Azure CosmosDB Account for development. Now click on the explorer and create the database and container. The explorer will then look like this:


We are storing the employee basic data in the Azure CosmosDB, and we are planning to use Department as a partition key and ID as the unique id for our employee records.

Note:
  • The ID and Department properties should be part of your backend input while inserting or updating the records; otherwise, you will get the exceptions.
I hope you have completed the required setup as explained in this article, including the creation of the Azure Cosmos account and database.

Step 3: Create ASP.NET Core web api Project

  1. Start then  All Programs and select "Microsoft Visual Studio".
  2. Once the Visual Studio Opens, Then click on Continue Without Code.
  3. Then Go to Visual Studio Menu, click on File => New Project then choose ASP.NET Core Web Api Project Template.
  4. Then define the project name, location of the project, then click on the next button.
  5. On the next screen, provide the additional details: framework, authentication type, and check the Enable Open API Support checkbox as shown below.


The preceding steps will create the ASP.NET Core Web API application and solution explorer. It will look like what is shown in the following image.


Step 4: Add Microsoft.Azure.Cosmos Nuget Package Reference

The Microsoft.Azure.Cosmos is the the latest nuget package to interact with the Azure cosmos DB. The Microsoft.Azure.Cosmos supports the basic to custom and complex database operations, follow the following steps to add the Nuget package.

  1. Right click on the Solution Explorer, find Manage NuGet Package Manager and click on it
  2. After as shown into the image and type in search box Microsoft.Azure.Cosmos
  3. Select Microsoft.Azure.Cosmos as shown into the image, 
  4. Choose version of Microsoft.Azure.Cosmos library and click on install button


I hope you have followed the same steps and installed the Microsoft.Azure.Cosmos nuget package.The next step is to delete the default controller and model class so we can start from scratch.


Step 5:Create the Model Class

  • First, delete the default model class, which is created outside the folder structure, so we can start from scratch. 
  • Next, create the folder named Model by right clicking on the solution explorer.
  • Create the model class Employee Model by right clicking on the Model folder, as shown in the following image


Now open the EmployeeModel.cs class file and add the following code.

EmployeeModel.cs

namespace EmployeeManagement.Model
{
    public class EmployeeModel
    {
        public string? id { get; set; }
        public string? Name { get; set; }
        public string? Country { get; set; }
        public string? City { get; set; }       
        public string? Department { get; set; }
        public string? Designation { get; set; }
        public DateTime? JoiningDate { get; set; }

    }
}

Step 6: Add the Controller

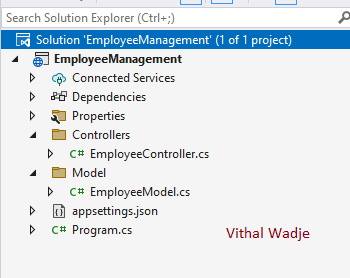
Create the Empty API Controller class EmployeeController by right clicking on the Controller folder as shown in the following image.


After adding the model class and API controller class, the solution explorer will look like the following:


Now open the EmployeeController.cs file and add the add the following configuration.
  • Define the following route at controller level, so that we can add the multiple Get, Post, Put, or Delete and avoid the name ambiguity exception.
    [ApiController]
    [Route("[api/[controller]/[action]]")]
    public class EmployeeController : ControllerBase
    {
    }

  • Declare the following variable and set the Azure Cosmos DB configuration by copying the details from step 2.
    [ApiController]
    [Route("api/[controller]/[action]")]
    public class EmployeeController : ControllerBase
    {
       
        // Cosmos DB details, In real use cases, these details should be configured in secure configuraion file.
        private readonly string CosmosDBAccountUri = "https://localhost:8081/";
        private readonly string CosmosDBAccountPrimaryKey = "C2y6yDjf5/R+ob0N8A7Cgv30VRDJIWEHLM+4QDU5DE2nQ9nDuVTqobD4b8mGGyPMbIZnqyMsEcaGQy67XIw/Jw==";
        private readonly string CosmosDbName = "EmployeeManagementDB";
        private readonly string CosmosDbContainerName = "Employees";
}

Step 7: Create Method to Add Employee

Add the following code into the EmployeeController.cs class to Add the employees into the CosmosDB. This method takes input values using  the EmployeeModel class. 

        [HttpPost]
        public async Task<IActionResult> AddEmployee(EmployeeModel employee)
        {
            try
            {
                var container = ContainerClient();
                var response = await container.CreateItemAsync(employee, new PartitionKey(employee.Department));

                return Ok(response);
            }
            catch (Exception ex)
            {

                return BadRequest(ex.Message);
            }
               
        } 


As explained in step 2, we are passing the ID and Department as a partition key as part of the employee input payload while adding the employee details. These parameters must be part of the input parameter payload.

The entire code of the EmployeeController.cs class file will look like the following after adding all the methods together:

EmployeeController.cs

using EmployeeManagement.Model;
using Microsoft.AspNetCore.Mvc;
using Microsoft.Azure.Cosmos;

namespace EmployeeManagement.Controllers
{
    [ApiController]
    [Route("api/[controller]/[action]")]
    public class EmployeeController : ControllerBase
    {
       
        // Cosmos DB details, In real use cases, these details should be configured in secure configuraion file.
        private readonly string CosmosDBAccountUri = "https://localhost:8081/";
        private readonly string CosmosDBAccountPrimaryKey = "C2y6yDjf5/R+ob0N8A7Cgv30VRDJIWEHLM+4QDU5DE2nQ9nDuVTqobD4b8mGGyPMbIZnqyMsEcaGQy67XIw/Jw==";
        private readonly string CosmosDbName = "EmployeeManagementDB";
        private readonly string CosmosDbContainerName = "Employees";


        /// <summary>
        /// Commom Container Client, you can also pass the configuration paramter dynamically.
        /// </summary>
        /// <returns> Container Client </returns>
        private  Container  ContainerClient()
        {

            CosmosClient cosmosDbClient = new CosmosClient(CosmosDBAccountUri, CosmosDBAccountPrimaryKey);
            Container containerClient = cosmosDbClient.GetContainer(CosmosDbName, CosmosDbContainerName);
            return containerClient;
           
        }


        [HttpPost]
        public async Task<IActionResult> AddEmployee(EmployeeModel employee)
        {
            try
            {
                var container = ContainerClient();
                var response = await container.CreateItemAsync(employee, new PartitionKey(employee.Department));

                return Ok(response);
            }
            catch (Exception ex)
            {

                return BadRequest(ex.Message);
            }
               
        }

    }
}

Now, we have all the code and required configuration to work with Azure CosmosDB in our sample application.

Step 8: Run the ASP.NET Core API Application

Now press Keyboard F5 or the Visual Studio Run button to run the application. After running the application, the following screen will be shown in the browser with swagger UI having all the methods which we have created in our ASP.NET core web API, as shown in the following screenshot:


Now, we will test the functionality by using the Swagger UI, but you can use Postman or any other tool to execute the API endpoints.

Step 9: Azure Cosmos DB Data Insert Demo 

The following animated image shows how the data gets added to the Azure Cosmos DB with SQL API.

Add Employees


Summary

SQL Stored Procedure with Return Output Parameter

In this article, we will learn how to get the return value using the SQL stored procedure Output parameter. There are some scenarios where we need the return value using the SQL stored procedure such as whenever a new order is created into the database, then return an OrderId to the user for reference.

Let's consider the similar scenario and we have the following table OrderDetails which maintains the processed orders as shown in the following image.


I hope you have created the same table structure as shown above. Now create the stored procedures to get the return value as in the following code snippet.

Create PROCEDURE PlaceOrder  
(  
@Product varchar(50),  
@Amount decimal(18,2),  
@OrderId int out  
)  
AS  
BEGIN  
SET NOCOUNT ON;  
  
INSERT INTO [dbo].[OrderDetails]  
           (  
            Product,  
            Amount
           )  
     VALUES  
           (  
          @Product,  
          @Amount
           )  
select @OrderId=isnull(max(OrderId),0) from OrderDetails

END 

Now execute the stored procedure using the SQL editor as follows.


In the preceding, The stored procedure inserts the new order into the SQL table and return the out value as OrderId using the stored procedure.

Summary

I hope from the preceding explanation, you have learned how to return the value using the SQL stored procedure. If you have any queries, then you can send using the following comment box.

Related articles


How To Use SQL Stored Procedure with Dapper ORM

In this article, we will learn how to use the SQL stored procedures with dapper ORM by writing a few lines of code. Let's consider we have the following values that need to be inserted into the SQL database using a stored procedure with the help of dapper ORM.

  • Name
  • City
  • Address

Create the stored procedure to map the above parameters.

Create procedure [dbo].[AddNewEmpDetails]  
(  
   @Name varchar (50),  
   @City varchar (50),  
   @Address varchar (50)  
)  
as  
begin  
   Insert into Employee values(@Name,@City,@Address)  
End 

Create the C# property class to map the above stored procedure parameters

    public class Employee

    {     
       [Required(ErrorMessage = "First name is required.")]
        public string Name { get; set; }
        [Required(ErrorMessage = "City is required.")]
        public string City { get; set; }
        [Required(ErrorMessage = "Address is required.")]
        public string Address { get; set; }

    }

Create the method to insert the values using the dapper.

       public void AddEmployee(Employee objEmp)

        {
            //Passing stored procedure using Dapper.NET
                connection();
                con.Execute("AddNewEmpDetails", objEmp, commandType: CommandType.StoredProcedure);
               
       }

 In the above method
  • Connection() is the method which contains the connection string .
  • Con is the SqlConnection class object.
  • AddNewEmpDetails is the stored procedure.
  • ObjEmp is the object of model class

Summary

I hope this article is useful for all readers. If you have any questions then type in comment box.

Related Article

How To Get Return Value Using SQL Stored Procedure

In this article, we will learn how to get the return value using the SQL stored procedure Out parameter. There are some scenarios where we need the return value using the SQL stored procedure such as whenever a new order is created into the database, then return an OrderId to the user for reference.

Let's consider the similar scenario and we have the following table OrderDetails which maintains the processed orders as shown in the following image.


I hope you have created the same table structure as shown above. Now create the stored procedures to get the return value as in the following code snippet.

Create PROCEDURE PlaceOrder  
(  
@Product varchar(50),  
@Amount decimal(18,2),  
@OrderId int out  
)  
AS  
BEGIN  
SET NOCOUNT ON;  
  
INSERT INTO [dbo].[OrderDetails]  
           (  
            Product,  
            Amount
           )  
     VALUES  
           (  
          @Product,  
          @Amount
           )  
select @OrderId=isnull(max(OrderId),0) from OrderDetails

END 

Now execute the stored procedure using the SQL editor as follows.


In the preceding, The stored procedure inserts the new order into the SQL table and return the out value as OrderId using the stored procedure.

Summary

I hope from the preceding explanation, you have learned how to return the value using the SQL stored procedure. If you have any queries, then you can send using the following comment box.

Related articles


How To Delete Records From Azure SQL Table

In this article we will learn how to delete the records from the Azure SQL table using step by step, so beginners and students can also understand.

Prerequisites

If you are new to the Azure SQL, then please watch my following videos on the Azure SQL database.

How To Create Azure SQL Database

How To Connect Azure SQL Database

Let us consider we have the Employee table in our Azure SQL Server database having the following records,


The following two commands are used to delete the records from the Azure SQL table.

  • Delete
  • Truncate

Using Delete Command

The delete command is used to delete all the records from the table or specific records by using the Where clause.

What does Delete Command Do?

  • The Delete command can be used with or without a WHERE clause.
  • The Delete command removes all records if you use it without the where condition.
  • The Delete command removes the one or more rows based on the condition given in the Where clause.
  • The Delete command maintains the logs of each deleted record. This helps to keep track of each deleted record.
  • The Delete command activates triggers. It means you can take certain action whenever you delete the record, such as inserting the deleted records in some other table etc.
  • The Delete can be rolled back. It means that if the records are deleted by mistake, then we can restore the deleted record back to the table.
  • The Delete command does not reset the identity of the table. It means that when you delete all the records from the table having Id between 1 and 10, then after adding the new record in the table, it will start with the ID count from 11, not 1.

Deleting Specific Records

To delete the specific record from the table, we need to use the where clause.

Syntax

delete from TableName where ColumName=value

Example

delete from Employee where Id=1

The above query will delete the records from the Employee table which has id 1. After deleting the record, then the table records will look like as follows.

Deleting all records

To delete all records from the table, we need to write a query without the where clause.

Example

delete from Employee

The above query will delete all records from the Employee table.

Using Truncate command

The truncate command removes all the rows from a table.

What does Truncate Command Do?

  • Truncate removes all rows from a table, but the table structure such as columns, constraints, indexes remains. 
  • Truncate command can not be used with where or any condition.
  • Truncate command can not be activates the trigger, It means we can not take any action on deleted records.
  • Truncate cannot be rolled back, it means deleted records from the table cannot be restored.
  • Truncate resets the identity of the table, it means that when you delete all the records from the table having Id between 1 and 10, then after adding the new record in the table, it will start with the ID count from 1, not 11.
  • Truncate command can not be maintains the logs of deleted record. It means we can not keep the track of each deleted record.
Example

truncate table Employee

The preceding query deletes all the records from the table.

Summary

I hope this article helped to know how to delete records from the Azure SQL database. If you have a suggestion related to the article, then please comment using the comment box.

Azure SQL Alter Table Statement

In this article we will learn about the Azure SQL alter statement. In the previous article we have learned how create and connect to the Azure SQL database. If you are new to the Azure SQL, then please watch my following videos on the Azure SQL database.

How To Create Azure SQL DataBase

How To Connect Azure SQL DataBase Using SQL Management Studio


What is SQL Alter Table Statement?

Alter statement used to modify the structure of the existing table. The alter statement used is to add, drop the table column. It can also be used to change the data types of the column etc.
Let us consider we have the table having name Employee in our Azure SQL Server database having the following records,


Add Column To Existing Table Using Alter Statement

The following SQL query will add the new column Salary into the existing table.

ALTER TABLE Employee
ADD salary  decimal(50);

You can alter the multiple columns at a time, the following query will alter the multiple columns of the existing table.

ALTER TABLE Employee ADD
(
Location varchar (50),
EmailID Varchar (50)
)

Modify The Existing Table Column
You can rename or change the data type of the column using the alter statement.
Example
ALTER TABLE Employee 
MODIFY Salary  decimal(60);

The preceding query will change the Salary column data type size to 60 from previous 50.
Drop The Column of Existing Table

ALTER TABLE Employee
DROP COLUMN Salary;

The preceding SQL query will remove the Salary column from the existing Employee table.
Summary
I hope from all the above demonstration, you have learned about the Azure SQL Alter statement and its uses of the Alter statement.

Related Article

Download Binary Data From SQL Using ASP.NET MVC

This articles explains how to download binary data from SQL database using ASP.NET MVC, please read my previous article which shows how to upload files into the database in binary format.
Let's consider we have following SQL table having the binary format data.


Now let's create the front end application step by step using ASP.NET MVC to download the files 

Step 1: Create an ASP.NET MVC Application

  1. "Start", followed by "All Programs" and select "Microsoft Visual Studio 2015".
  2. Click "File", followed by "New" and click "Project". Select "ASP.NET Web Application Template", provide the Project a name as you wish and click OK. After clicking, the following Window will appear:


Step 2: Create Model Class

Now, let us create the model class file, named FileDetailsModel.cs, by right clicking on Models folder and define the following properties  as:
public class FileDetailsModel  
   {  
       public int Id { get; set; }  
       [Display(Name = "Uploaded File")]  
       public String FileName { get; set; }  
       public byte[] FileContent { get; set; }  
  
  
   }  

Step 3 : Create Stored Procedure

Now Create the stored procedure to view the uploaded files using following script as
CREATE Procedure [dbo].[GetFileDetails]  
(  
@Id int=null  
)  
as  
begin  
select Id,FileName,FileContent from FileDetails  
where Id=isnull(@Id,Id)  
End  

Step 4 : Add Controller Class

Now, let us add ASP.NET MVC controller, as shown in the screenshot, given below:


After clicking Add button, it will show the Window. Specify the Controller name as Home with suffix Controller. Now, let's modify the default code of Home controller . After modifying the code of Homecontroller class, the code will look like:

HomeController.cs
using System;  
    using System.Collections.Generic;  
    using System.IO;  
    using System.Linq;  
    using System.Web;  
    using System.Web.Mvc;  
    using Dapper;  
    using System.Configuration;  
    using System.Data.SqlClient;
    using FileUploadDownLoadInMVC.Models;  
    using System.Data;  
      
    namespace FileUploadDownLoadInMVC.Controllers  
    {  
        public class HomeController : Controller  
        {  
             
            #region Upload Download file  
            public ActionResult Index()  
            {  
                return View();  
            }  
                   
            [HttpGet]  
            public FileResult DownLoadFile(int id)  
            {  
      
      
                List<FileDetailsModel> ObjFiles = GetFileList();  
      
                var FileById = (from FC in ObjFiles  
                                where FC.Id.Equals(id)  
                                select new { FC.FileName, FC.FileContent }).ToList().FirstOrDefault();  
      
                return File(FileById.FileContent, "application/pdf", FileById.FileName);  
      
            }  
            #endregion  
     
            #region View Uploaded files  
            [HttpGet]  
            public PartialViewResult FileDetails()  
            {  
                List<FileDetailsModel> DetList = GetFileList();  
      
                return PartialView("FileDetails", DetList);  
      
      
            }  
            private List<FileDetailsModel> GetFileList()  
            {  
                List<FileDetailsModel> DetList = new List<FileDetailsModel>();  
      
                DbConnection();  
                con.Open();  
                DetList = SqlMapper.Query<FileDetailsModel>(con, "GetFileDetails", commandType: CommandType.StoredProcedure).ToList();  
                con.Close();  
                return DetList;  
            }  
     
            #endregion       
            #region Database connection  
      
            private SqlConnection con;  
            private string constr;  
            private void DbConnection()  
            {  
                 constr =ConfigurationManager.ConnectionStrings["dbcon"].ToString();  
                 con = new SqlConnection(constr);  
      
            }  
            #endregion  
        }  
    }   
The preceding code snippet explained everything to upload  PDF file into database , I hope you have followed the same.

 Step 5:  Create View

Right click on View folder of the created Application and create view named Index and Partial view FileDetails , The code snippet of the view's is look like as following.

Index.cshtml

@{  
    ViewBag.Title = "www.compilemode.com";  
}  
  
@using (Html.BeginForm())  
{  
    @Html.AntiForgeryToken()    
        <div class="form-group">  
            <div class="col-md-offset-2 col-md-10 text-success">  
                @ViewBag.FileStatus  
            </div>  
        </div>  
  
        <div class="form-group">  
            <div class="col-md-8">  
                @Html.Action("FileDetails", "Home")  
  
            </div>  
        </div>  
    </div>  
}  
<script src="~/Scripts/jquery-1.10.2.min.js"></script>  
<script src="~/Scripts/jquery.validate.min.js"></script>  
<script src="~/Scripts/jquery.validate.unobtrusive.min.js"></script>  

FileDetails.cshtml

@model IEnumerable<FileUploadDownLoadInMVC.Models.FileDetailsModel>  
<table class="table table-bordered">  
    <tr>  
        <th class="col-md-4">  
            @Html.DisplayNameFor(model => model.FileName)  
        </th>  
          
        <th class="col-md-2"></th>  
    </tr>  
  
@foreach (var item in Model) {  
    <tr>  
        <td>  
            @Html.DisplayFor(modelItem => item.FileName)  
        </td>  
          
        <td>  
            @Html.ActionLink("Downlaod", "DownLoadFile", new { id=item.Id })   
             
        </td>  
    </tr>  
}  
  
</table> 


Step 6 - Run the Application

After running the Application, the UI of the Application will look like as follows


Now click on download button , then it will shows the following popup


Choose to open or save the file , I have chosen to open the files , the contents of the files will be look like as follows


I hope, from the preceding examples, you have learned, how to download binary formatted PDF files from database.

Note
  • This article used dapper ORM to interact with the database. Thus, you need to install dapper ORM into the Application. If you don't know how to install dapper ORM in MVC, watch the video, using the link, given below
  • Makes changes in web.config file connectionstring tag, based on your database location and configuration.
  • Since this is a demo, it might not be using the proper standards. Thus, improve it, depending on your skills.
Summary

I hope, this article is useful for all the readers. If you have any suggestions, please contact me.

    Video: Creating Stored Procedure in SQL Server

    This video tutorial explains how to create stored procedure step by step which covers the following topics
    • What is stored procedure in SQL?
    • Why to create stored procedure?
    • Ways of creating stored procedure using SSMS ( SQL Server Management studio)
    • Creating stored procedure
    • Defining input parameters for stored procedure
    • Documenting stored procedure use details
    • Executing stored procedure
    Now Let's watch


    Summary
    I hope this video tutorial is useful for all viewers , If you like video then  don't forget to share and  subscribe compilemode.com YouTube Channel.

    Don't Forget To  

    Downloading Binary Files From SQL DataBase Using ASP.NET MVC

    This articles explains the step by step how to download the files in ASP.NET MVC from database which is stored in a binary format , So lets learn step by step so beginners also can also understand .

    Step 1 : View Binary formatted Uploaded Files

    Step 2: Create an MVC Application.
    Now, let us create a simple MVC application to download the uploaded  file as:
    1. "Start", followed by "All Programs" and select "Microsoft Visual Studio 2015".
    2. Click "File", followed by "New" and click "Project". Select "ASP.NET Web Application Template", provide the Project a name as you wish and click OK. After clicking, the following Window will appear:
    Step 3: Create Model Class
    Now, let us create the model class file, named FileDetailsModel.cs, by right clicking on Models folder and define the following properties  as:
    public class FileDetailsModel  
       {  
           public int Id { get; set; }  
           [Display(Name = "Uploaded File")]  
           public String FileName { get; set; }  
           public byte[] FileContent { get; set; }  
      
      
       }  
    Step 4 : Create Stored Procedure
    Now Create the stored procedure to view the uploaded files using following script as
    CREATE Procedure [dbo].[GetFileDetails]  
    (  
    @Id int=null  
    )  
    as  
    begin  
    select Id,FileName,FileContent from FileDetails  
    where Id=isnull(@Id,Id)  
    End  
     I hope same you have created ;
    Step 5 : Add Controller Class
    Now, let us add ASP.NET MVC controller, as shown in the screenshot, given below:

    After clicking Add button, it will show the Window. Specify the Controller name as Home with suffix Controller. Now, let's modify the default code of Home controller . After modifying the code of Homecontroller class, the code will look like:
    HomeController.cs
    using System;  
        using System.Collections.Generic;  
        using System.IO;  
        using System.Linq;  
        using System.Web;  
        using System.Web.Mvc;  
        using Dapper;  
        using System.Configuration;  
        using System.Data.SqlClient;
        using FileUploadDownLoadInMVC.Models;  
        using System.Data;  
          
        namespace FileUploadDownLoadInMVC.Controllers  
        {  
            public class HomeController : Controller  
            {  
                 
                #region Upload Download file  
                public ActionResult Index()  
                {  
                    return View();  
                }  
                       
                [HttpGet]  
                public FileResult DownLoadFile(int id)  
                {  
          
          
                    List<FileDetailsModel> ObjFiles = GetFileList();  
          
                    var FileById = (from FC in ObjFiles  
                                    where FC.Id.Equals(id)  
                                    select new { FC.FileName, FC.FileContent }).ToList().FirstOrDefault();  
          
                    return File(FileById.FileContent, "application/pdf", FileById.FileName);  
          
                }  
                #endregion  
         
                #region View Uploaded files  
                [HttpGet]  
                public PartialViewResult FileDetails()  
                {  
                    List<FileDetailsModel> DetList = GetFileList();  
          
                    return PartialView("FileDetails", DetList);  
          
          
                }  
                private List<FileDetailsModel> GetFileList()  
                {  
                    List<FileDetailsModel> DetList = new List<FileDetailsModel>();  
          
                    DbConnection();  
                    con.Open();  
                    DetList = SqlMapper.Query<FileDetailsModel>(con, "GetFileDetails", commandType: CommandType.StoredProcedure).ToList();  
                    con.Close();  
                    return DetList;  
                }  
         
                #endregion       
                #region Database connection  
          
                private SqlConnection con;  
                private string constr;  
                private void DbConnection()  
                {  
                     constr =ConfigurationManager.ConnectionStrings["dbcon"].ToString();  
                     con = new SqlConnection(constr);  
          
                }  
                #endregion  
            }  
        }   
    The preceding code snippet explained everything to upload  PDF file into database , I hope you have followed the same .
     Step 6:  Create View
    Right click on View folder of the created Application and create view named Index and Partial view FileDetails , The code snippet of the view's is look like as following .
    Index.cshtml
    @{  
        ViewBag.Title = "www.compilemode.com";  
    }  
      
    @using (Html.BeginForm())  
    {  
        @Html.AntiForgeryToken()    
            <div class="form-group">  
                <div class="col-md-offset-2 col-md-10 text-success">  
                    @ViewBag.FileStatus  
                </div>  
            </div>  
      
            <div class="form-group">  
                <div class="col-md-8">  
                    @Html.Action("FileDetails", "Home")  
      
                </div>  
            </div>  
        </div>  
    }  
    <script src="~/Scripts/jquery-1.10.2.min.js"></script>  
    <script src="~/Scripts/jquery.validate.min.js"></script>  
    <script src="~/Scripts/jquery.validate.unobtrusive.min.js"></script>  
    FileDetails.cshtml
    @model IEnumerable<FileUploadDownLoadInMVC.Models.FileDetailsModel>  
    <table class="table table-bordered">  
        <tr>  
            <th class="col-md-4">  
                @Html.DisplayNameFor(model => model.FileName)  
            </th>  
              
            <th class="col-md-2"></th>  
        </tr>  
      
    @foreach (var item in Model) {  
        <tr>  
            <td>  
                @Html.DisplayFor(modelItem => item.FileName)  
            </td>  
              
            <td>  
                @Html.ActionLink("Downlaod", "DownLoadFile", new { id=item.Id })   
                 
            </td>  
        </tr>  
    }  
      
    </table> 
    Now, we have done all the coding.
    Step 7 - Run the Application
    After running the Application, the UI of the Application will look like as follows


    Now click on download button , then it will shows the following popup


    Choose to open or save the file , I have chosen to open the files , the contents of the files will be look like as follows


    I hope, from the preceding examples, you have learned, how to download binary formatted PDF files from database.
    Note
    • This article used dapper ORM to interact with the database. Thus, you need to install dapper ORM into the Application. If you don't know how to install dapper ORM in MVC, watch the video, using the link, given below-
    • Makes changes in web.config file connectionstring tag, based on your database location and configuration.
    • Since this is a demo, it might not be using the proper standards. Thus, improve it, depending on your skills.
    Summary
    I hope, this article is useful for all the readers. If you have any suggestions, please contact me.

    Read related article
    Don't Forget To 

      Deleting Records From SQL Table

      In this article we will learn how to delete the records from the SQL table using different ways with step by step so beginners and students  can also understand .
      Let us consider we have following table names employee in our SQL Server database having following records.
      There are following two ways to delete the records from table in SQL Server .
      1. Using Delete Command
      2. Using Truncate command 
      • Delete command
      Delete command removes the rows from a table based on the condition that we provide with a WHERE clause.
       key points
      1. DELETE removes rows one at a time and records an entry in the transaction log for each deleted row.
      2. If you want to retain the identity counter, use DELETE instead. If you want to remove table definition and its data, use the DROP TABLE statement.
      3. DELETE Can be used with or without a WHERE clause
      4. DELETE Activates Triggers.
      5. DELETE can be rolled back.
      6. DELETE is DML Command.
      7. DELETE does not reset identity of the table.
      Deleting Specific record
      To delete the specific record from table then we need to use where clause .
      Syntax
      delete from TableName where ColumName=value
      Example
      Lets us consider we are deleting records from above employee table which has id one as
      delete from Employee where Id=1
      Above query will delete the records from employee table which has id 1 ,after deleting the record then table records will be look like as follows

       Deleting all records
      To delete all records from table we need write query without where clause .
      Syntax
      delete from TableName
      Example
      delete from Employee
      Above query will delete the all records from employee table.
      • Truncate command
      Truncate will actually remove all the rows from a table and there will be no data in the table after we run the truncate command.
      keypoints
      1. TRUNCATE is faster and uses fewer system and transaction log resources than DELETE.
      2. TRUNCATE removes the data by deallocating the data pages used to store the table's data, and only the page deallocations are recorded in the transaction log.
      3. TRUNCATE removes all rows from a table, but the table structure, its columns, constraints, indexes and so on, remains. The counter used by an identity for new rows is reset to the seed for the column.
      4. You cannot use TRUNCATE TABLE on a table referenced by a FOREIGN KEY constraint. Because TRUNCATE TABLE is not logged, it cannot activate a trigger.
      5. TRUNCATE cannot be rolled back.
      6. TRUNCATE is DDL Command.
      7. TRUNCATE Resets identity of the table.
       Syntax
      truncate table TableName
      Example
      truncate table Employee
      Summary
      I hope this article is useful for all readers . If you have a suggestion related to this article then please contact me.

      www.CodeNirvana.in

      Protected by Copyscape
      Copyright © Compilemode