In my last article, we learned about the Azure device provisioning service, which allows us to manage IoT devices. If you have not read my previous article about the Azure device provisioning service yet, then please read it using the following link:
Now we have a platform to manage the IoT devices, but what about connecting the devices to some platform and getting the data from those connected devices? We must connect the device to some gateway platform to establish a secure connection between the cloud and the device to exchange the data. So, in this article, we will learn about the Azure IoT hub and the role of the IoT hub in managing the IoT devices' communication and telemetry data.
What is Azure IoT?
Azure IoT is the IoT gateway for IoT devices, which allows bi-directional communication between IoT devices and the cloud and from the cloud to IoT devices. Azure IoT can process the millions of IoT devices and route the messages to specific data storage platforms.Key Advantages of Azure IoT
- Built-in UI to manage and monitor the IoT devices
- Capture entire device lifecycle events using the device lifecycle change event feature.
- Allows us to upgrade the firmware of single or bulk numbers of devices using the automatic device management feature.
- Built-in support for bidirectional communication between IoT devices and the cloud
- The IoT hub allows us to connect edge devices and IoT devices, which means the IoT hub is capable of connecting low-powered and high-processing devices.
- IoT devices can send telemetry data as well as connect devices over a network using the AMQP, MQTT, and HTTPS protocols to the Azure IoT hub.
- The Azure IoT Hub has multiple device authentication mechanisms, including X509, TPM, and symmetric keys.
- The message routing feature helps to route messages to a specific data store and data processing platform.
- built-in support for uploading the file for a specific device, which can be used for device upgradation or storing device process-related information.
- Azure IoT hub IoT Hub allows us to send commands to the device, which can help change the behaviour of the device using the "Cloud to Device" message feature.
- provides the device-twinning feature for storing metadata or other information about IoT devices.
- Azure IoT Hub is intended to be a secure platform for device communication and authentication, utilising communication protocols AMQP, MQTT, and HTTPS as well as authentication mechanisms such as X509, TPM, and symmetric keys.
- The IoT hub provides various options to establish bi-directional communication between the cloud and devices programmatically with SDKs in C#, Java, Python, Node.js, and Android, as well as an API for the IoT hub.
- allows you to enable or disable the connected IoT devices.
- built-in support for routing and filtering the messages to the other services.
Creating An Azure IoT Hub Using Azure Portal
Azure IoT Hub can be created using:
- Azure CLI
- SDK
- API
- ARM
- Azure portal
In this article, we will be creating an IoT hub using the portal so we can avoid confusion for beginners. Now let’s start creating the azure IoT hub step-by-step via the Azure portal.
Prerequisites
Step 1: Go to the Azure Portal
Navigate to the portal.azure.com using your browser and login into the portal with valid credentials, as shown in the following image:

After a successful login, the page will be redirected to the Azure portal, by default, the dashboard page is set as:

Step 2: Create Azure IoT
Find the create resource option which can be found on the left top side of the portal as shown in the following image or follow any other option which you may know to create the resource (service) in the Azure portal:

Click on the left side option to create a resource & type IoT hub into the populated search box, it will pop up the following screen as:

As shown in the preceding image click on the create button, it will show the following screen:

Provide required details as shown in the preceding image:After providing all the basic required details, click to review and create the IoT hub, which skips the remaining steps, or click to choose the next step, networking. It shows the following screen to configure networking:
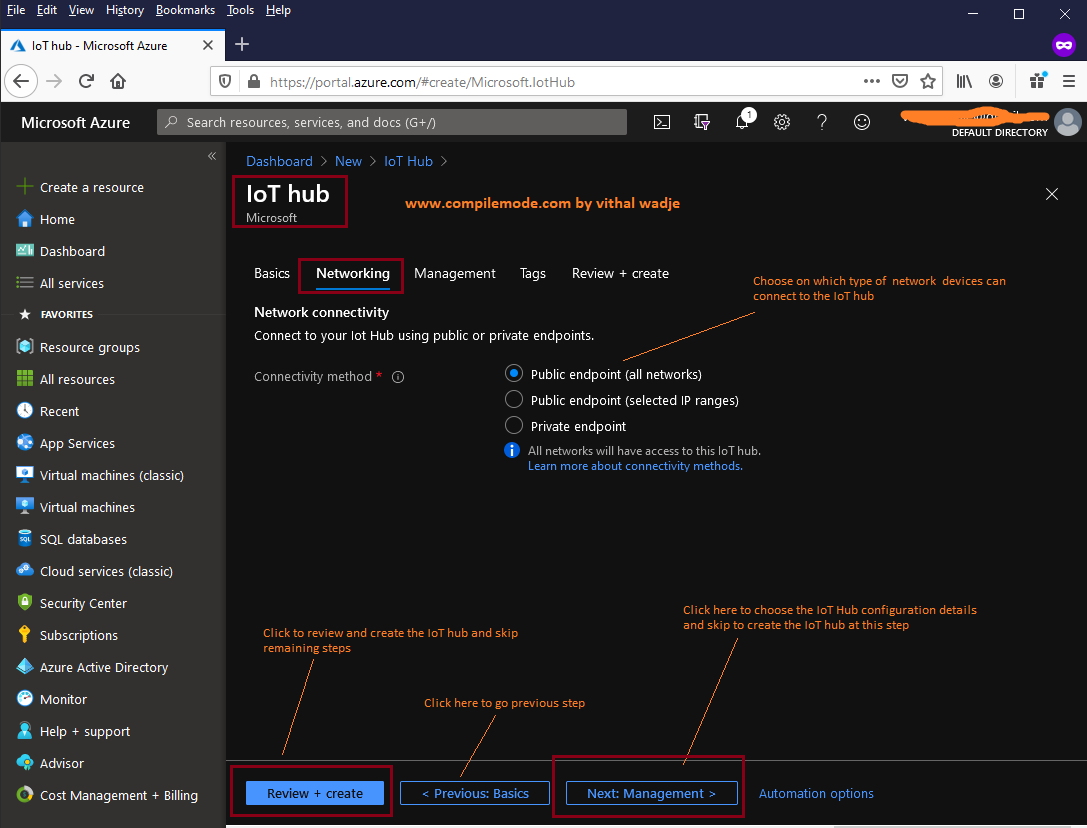
In the above image, we choose the connectivity method for the IoT hub which decides which network the devices can connect to the IoT hub, there are three methods:
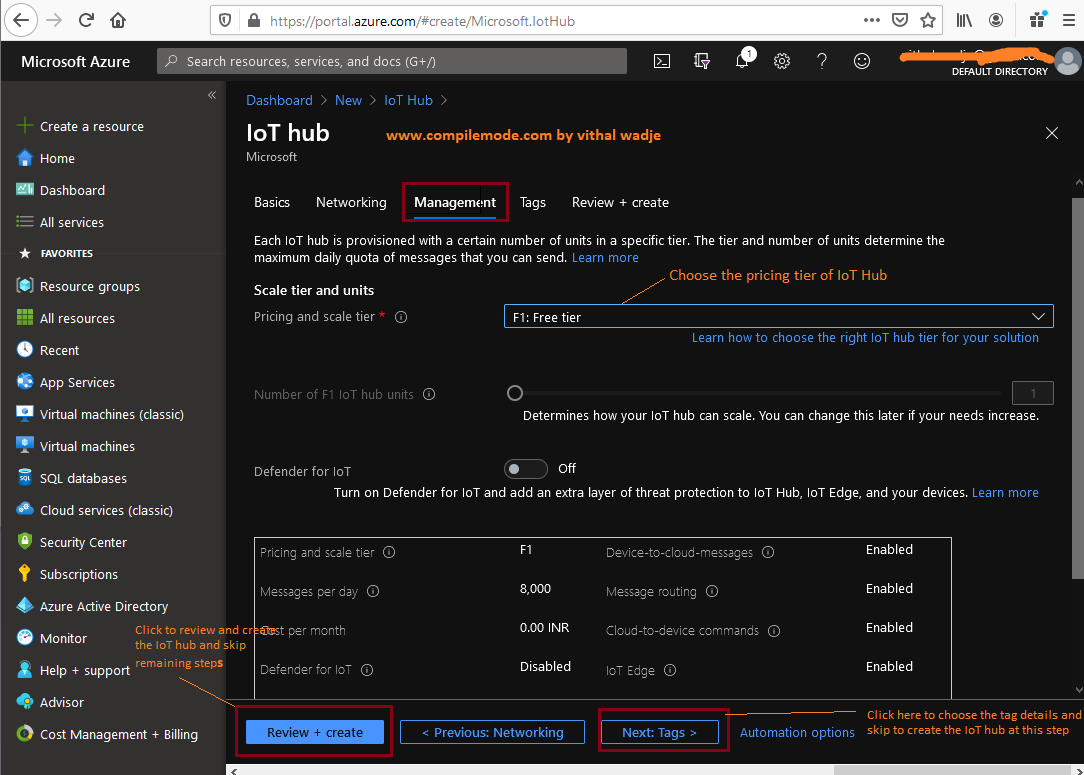
The preceding management step allows us to define the scalability and security of the IoT hub with the help of the following options:
There are different types of pricing and scale tiers that decide how many messages the device sends to the IoT hub per day and what feature does it supports. The features and message frequency of IoT hub can differ based on the pricing and scale tier. The pricing tiers are categorized as:
The F1 is the free tier by using you can use the free tier of IoT hub for your learning and check how IoT hub works. it allows 8000 messages per day with limited feature
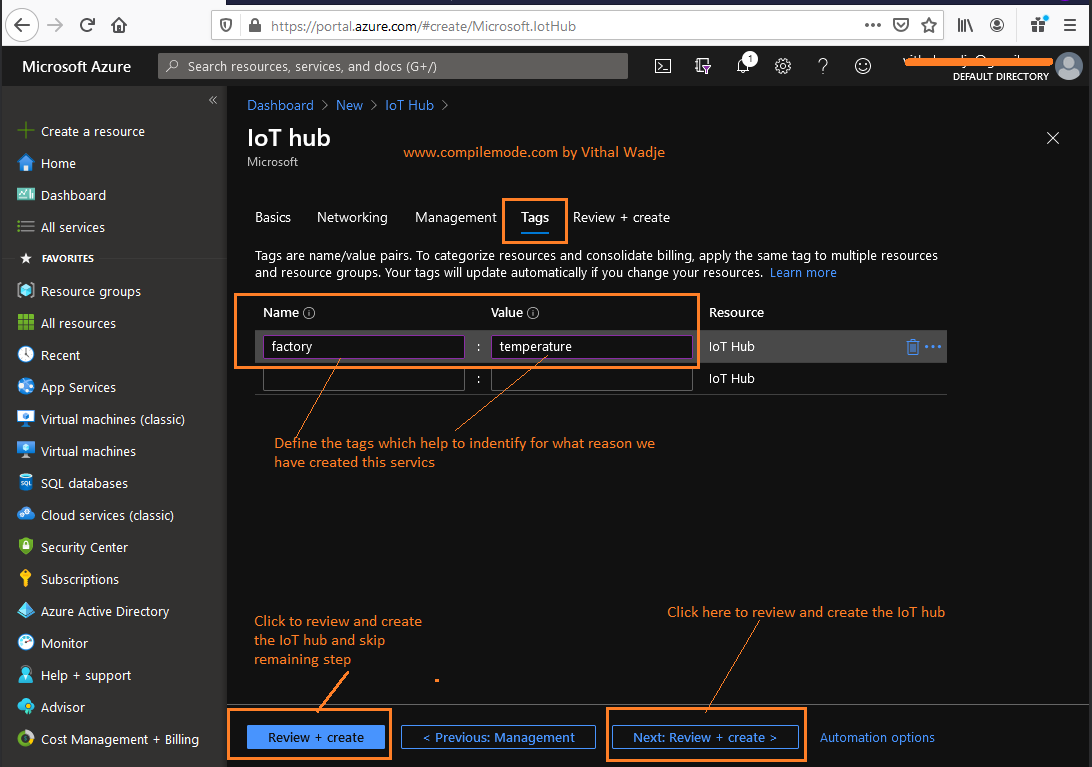
These tiers are most suitable for a production environment where hyper scalability and advanced security are required. Once you choose the configuration for the IoT hub, click on the next step tags, which shows the following screen:


Certificates
This section allows to add and save the device certificates which can be assigned to the devices during creating or adding the devices to the IoT hub.
Built-in Endpoints
Query Explorer
This section allows us to query devices that reside in the IoT hub. This feature is useful to query any device from the millions of devices from the IoT hub.
IoT Devices
This section lets you add the different types of IoT devices and related configuration.
Automatic Device Management
This section allows us to upgrade the firmware of individual or bulk of IoT devices based on the properties of the device such as tags or deviceId.
Messaging
This feature allows to capture the IoT device messages and their related events also you can route the messages to any other service such as data store etc.
Security
This section allows to secure the IoT devices using the IoT defender feature and create the security-related alerts
Monitoring
Summary
I hope this article was useful for understanding the basics of the Azure IoT hub service.
Articles you may interested


Provide required details as shown in the preceding image:
- Subscription: Choose the available azure subscription which you want to use for creating service from drop-down list
- Resource Group: Choose an existing resource group or create a new resource group that you may want to use.
- Region: Choose the deployment location for IoT hub device provisioning from the given list. However, the device provisioning service is global and associated with any specific location, but you must specify a location for the resource group where the metadata associated with the service profile will reside.
- IoT Hub Name: Name of the IoT hub service which must contain only alphanumeric characters or a hyphen.

In the above image, we choose the connectivity method for the IoT hub which decides which network the devices can connect to the IoT hub, there are three methods:
- Public Endpoint all Network
- Public Endpoint selected IP addresses
- Private Endpoint
This option allows us to connect devices to the IoT hub on all public networks for whoever has access to public URI and the required credentials.
Public Endpoint selected IP addresses
Even you have a public endpoint (URI) but want to restrict devices, you should connect from a specific IP address. Then you can define the range of IP addresses. The IoT hub allows you to connect only to devices that fall within the defined IP address range. This option gives the useful feature to allow only known networks to connect to the devices
Private EndPoint
This is the URI or endpoint which allows us to connect devices over the private network, which gives the robust security between devices and IoT hub communication
Once you choose your intended connectivity method, click on the next step which shows the step to configure the scalability of the IoT hub as:
Once you choose your intended connectivity method, click on the next step which shows the step to configure the scalability of the IoT hub as:

The preceding management step allows us to define the scalability and security of the IoT hub with the help of the following options:
- Pricing and Scale Tier
- IoT Hub Units
- Defender
Pricing and Scale Tier
Free Tier
Basic Tier
The basic tier is sub-categorized into the three types as
- B1
- B2
- B3
Standard Tier
The standard pricing and scale tier provides the most advanced features and scales for the incoming IoT messages, The standard tier subcategorized into the three types as:
- S1
- S2
- S3

The tagging helps to identify or categorize the services across the line of applications, after providing tags details, click on the next step review and create, it will show the following screen to review the details before creating the service:

After reviewing details, click on the create button, it will take some time to create the service. Once the service is created, the status can be notified on the notification icon as shown in the following image:

Now click on the Go to resource button, you will be redirected to the newly created IoT hub service as shown in the following image:

Let’s learn about the preceding Azure IoT hub key sections in brief, listed below:
The overview section of the IoT hub is like a dashboard where you can see an overview of the service details, including the charts for incoming messages, status, etc.
- Overview
- Certificates
- Built-in Endpoints
- Query Explorer
- IoT Devices
- Automatic Device Management
- Messaging
- Security
- Monitoring
Built-in Endpoints
This section contains the details which allow us to use the IoT hub as an event hub. The event hub compatible connectionString gives almost the same functionality as an event hub without creating any instance of the event hub.
Query Explorer
IoT Devices
Automatic Device Management
Messaging
Security
Monitoring
This section allows to monitor the logs related to the IoT hub, you can set any filter or rule for monitoring and create the alerts
I hope this article was useful for understanding the basics of the Azure IoT hub service.
Post a Comment