How To Create ASP.NET Core MVC Application

In this article we will learn how to create a step by step ASP.NET Core MVC web application. Prior to going the particle part let's know about the ASP.NET Core.

What is ASP.NET Core?

ASP.NET Core is an open source cross platform framework for developing and building web, cloud, IoT applications.

Why should we use ASP.NET Core?

  • ASP.NET is an open source platform which runs on Microsoft .NET Core Framework.
  • We can build and run the ASP.NET core application on a cross platform environment such as Windows, MacOs, Linux etc.
  • We can build modern apps such as Cloud, IoT, Web apps, mobile backend etc. and those can be easily enabled to run over the cloud platform.
  • We can host application on any modern platform such docker, AKS etc.
  • Saves the efforts of the developer by built-in features such as dependency injection, you can enable docker, containerization, swagger support in just one click.
Now let's start creating ASP.NET Core MVC web application.

Step 1: Open Visual Studio

  • Open Visual Studio ( I am using 2019)
  • Once the Visual Studio Opens, Then click on Continue Without Code as shown in the following image

  • Then from Visual Studio Menu, click on File => New Project, as shown in the following image


Click on the New Project, then the following window appears as shown in the step 2.

Step 2: Choose Project Template

You will see the two project templates,
  • ASP.NET Core Web App: This project template creates the web application with Razor pages without Model, View, Controller.
  • ASP.NET Core Web App (Model-View-Controller): This project template creates the web application with Model, View, Controller (MVC).
Choose the ASP.NET Core Web App (Model-View-Controller) Template as shown in the following image.


After choosing the project template click on Next.

Step 3: Define Project Name and Location

In the project configuration window you will see the following options,

Project Name
Define the any name for your project as per your choice.
Location
Choose the location to save the project files on your hard drive of the machine. I have chosen the Project/VS folder of the E drive of the machine, and obviously it's different on your computer.
Solution Name
Solution name is auto-defined based on the project name, but you can change the name based on your own choice. 
Additionally, there is a checkbox, if you have checked it, then the solution file (.sln) and project files will be saved in the same folder. Now Choose the minimum details for ease of understanding as shown in the following image.


After defining the required details, click on the Next.

Step 4: Choose the Target Framework

Choose the target framework .NET 5 which is the latest or you can choose based on your requirement, skip the other details for ease of understanding as shown in the following image.


After providing the required details, click the create button. It will create the ASP.NET Core MVC web application as shown in the following image.


The preceding is the project structure of the ASP.NET Core MVC web application.

Step 5: Run the ASP.NET Core MVC Application

You can run the application with default contents or let open the Index.cshtml file and put some contents there. Now press F5 on the Keyboard or use the run option from Visual Studio to run the application in the browser. After running the application, it will show in the browser as shown in the following image.


I hope from the preceding step by step demonstration, you have learned how to create the ASP.NET Core MVC Web Application.

Summary

I hope this article is useful to understand how to create ASP.NET Core MVC web application. In the next article we will learn how to perform the CRUD operation in ASP.NET Core MVC application.

Related Tutorial

How To Generate QR Code Using ASP.NET Core

In this article, we will learn how to generate a QR code using ASP.NET Core MVC. Let's learn step by step by creating an ASP.NET Core application.

Step 1: Create ASP.NET Core MVC Application

  • Start then  All Programs and select "Microsoft Visual Studio 2019".
  • Once the Visual Studio Opens, Then click on Continue Without Code.
  • Then Go to Visual Studio Menu, click on File => New Project then choose ASP.NET Core Web App (Model-View-Controller) Project Template.
  • Then define the project name, location of the project, Target Framework, then click on the create button.
The preceding steps will create the ASP.NET Core MVC application and solution explorer. It will look like as shown in the following image.


Delete the existing auto-generated code including controller and views for ease of understanding. We will add step by step while building the application.

Step 1: Add QRCoder Nuget Package Reference

The QRCoder is the open source pure C# library to generate the codes. The QRCoder supports the basic to custom and complex OR code generation, follow the following steps to add the Nuget package.
  • Right click on the Solution Explorer, find Manage NuGet Package Manager and click on it
  • After as shown into the image and type in search box "QRCoder"
  • Select QRCoder as shown into the image
  • Choose version of QRCoder library and click on install button

I hope you have followed the same steps and installed the QRCoder nuget package.

Step 2: Create the Model Class

Create the model class QRCodeModel by right clicking on the model folder to take the input text for QR code as shown in the following image.


Now open the QRCodeModel.cs class file and add the following code.

using System.ComponentModel.DataAnnotations;

namespace GeneratingQRCode.Models
{
    public class QRCodeModel
    {
        [Display(Name = "Enter QRCode Text")]
        public string QRCodeText { get; set; }

    }
}

Step 3: Add the Controller

Create the Controller class by right clicking on the Controller folder as shown in the following image.


Now open the HomeController.cs file and add the following code.

using GeneratingQRCode.Models;
using Microsoft.AspNetCore.Mvc;
using QRCoder;
using System;
using System.Drawing;
using System.Drawing.Imaging;
using System.IO;

namespace GeneratingQRCode.Controllers
{
    public class HomeController : Controller
    {

        [HttpGet]
        public IActionResult CreateQRCode()
        {
            return View();
        }

        [HttpPost]
        public IActionResult CreateQRCode(QRCodeModel qRCode)
        {
            QRCodeGenerator QrGenerator = new QRCodeGenerator();
            QRCodeData QrCodeInfo = QrGenerator.CreateQrCode(qRCode.QRCodeText, QRCodeGenerator.ECCLevel.Q);
            QRCode QrCode = new QRCode(QrCodeInfo);
            Bitmap QrBitmap = QrCode.GetGraphic(60);  
            byte[] BitmapArray = QrBitmap.BitmapToByteArray();
            string QrUri = string.Format("data:image/png;base64,{0}", Convert.ToBase64String(BitmapArray));
            ViewBag.QrCodeUri = QrUri;
            return View();
        }
    }

    //Extension method to convert Bitmap to Byte Array
    public static class BitmapExtension
    {
        public static byte[] BitmapToByteArray(this Bitmap bitmap)
        {
            using (MemoryStream ms = new MemoryStream())
            {
                bitmap.Save(ms, ImageFormat.Png);
                return ms.ToArray();
            }
        }
    }
}

Step 4: Create The View

Create the view with the name CreateQRCode using the model class QRCodeModel by right clicking on the view folder or right clicking in the controller class file as shown in the following image.


After clicking the Add button, it generates the view with the name CreateQRCode. Now open the CreateQRCode.cshtml file and replace the default generated code as follows:

CreateQRCode.cshtml

@model GeneratingQRCode.Models.QRCodeModel

@{
    ViewData["Title"] = "www.compilemode.com";
}
<hr />
<div class="row">
    <div class="col-md-4">
        <form asp-action="CreateQRCode">
            <div asp-validation-summary="ModelOnly" class="text-danger"></div>
            <div class="form-group">
                <label asp-for="QRCodeText" class="control-label"></label>
                <input asp-for="QRCodeText" class="form-control" />
                <span asp-validation-for="QRCodeText" class="text-danger"></span>
            </div>
            <div class="form-group">
                <input type="submit" value="Generate QR Code" class="btn btn-primary text-center" />
            </div>
            <div class="form-group">

                <img src="@ViewBag.QrCodeUri" class="img-thumbnail" />
            </div>
        </form>
    </div>
</div>
@section Scripts {
    @{await Html.RenderPartialAsync("_ValidationScriptsPartial");}
}

In the preceding code you see the image tag src Uri assigned with ViewBag, which we have set from the HomeController class.

Step 5: Configure the Routing

We have modified the auto-generated files, so we have to set the default routing so that when you run the application, then the default view can start in the browser. Now open the Startup.cs and set the default routing as per our controller and the created view as shown in the following image.


Step 6: Run the Application.

Now press Keyboard F5 or Visual Studio run button to run the application. After running the application, the following screen will be shown in the browser. Enter the QR code text and click on the Generate QR code button, then it will generate the following code as in the following screenshot.

Demo


Step 7: Read the QR Code

Open the your mobile phone QR code reader application and scan it, it will show the following text which we have entered during the QR code creation.


Summary

I hope, from all the above examples, you have learned how to generate a QR code using the ASP.NET Core. If you like it, share it with your friends, subscribe to the blog and YouTube channel for more such articles.

How To Add Docker Support For Existing ASP.NET Project

In this article we will learn how to add docker support for existing ASP.NET  or any .NET application, before enabling docker support let's know about the docker in brief

What is Docker?

Docker is one of the platform for containerizing the applications which allows to deliver the application in packages over the operating machine level virtualization. Docker allows to run and create the images in Linux and windows containers etc.

Step 1: Install Prerequisites

You need to install the docker client based on your operating system on your machine. you can download the docker by using the following link

The installed docker desktop client will be look like as shown in the following image, 


Hope you installed the prerequisites.

Step 2: Open Existing Application

Open your existing application in visual studio as shown in the following image


Docker client helps to create and run the docker images locally as well as created images you can push in to the any image container registry such as ACR or docker hub.

Step 3: Add Docker Support

Now right click on the solution explorer of your existing project and follows the steps which are shown in the following image


Once you click on the Docker Support option , It will prompt the screen which is shown in the step 4.

Step 4: Choose the Container

Choose the target operating system on which type of container you wants to run the application. Let's choose the Linux option which creates the image size smaller than windows container image.


In the preceding image click on the OK button, it will create the Docker file in your project solution as shown in the following image


Step 5: Open the Docker File

Now double click on docker file, it has following auto generated code from visual studio which has pre-configured steps to create and run the docker image 


Step 6:  Run the image in Docker Container

Choose the docker option to run the application as shown in the following image


After clicking on docker option, application runs inside the docker container as shown in the following image
 

Now our application running inside the Docker container instead of IIS express.

Note

This tutorial is for beginner so there is no command line tool used to build , run the docker container images in this tutorial. The intend of this tutorial to make familiar to beginners about docker and let them know docker is not difficult to learn.

Summary

I hope the preceding article is useful to understand how to enable the docker support for existing ASP.NET project with less efforts.

If you like my efforts and intend then support me by subscribing my YouTube Channel and blog by using the following links

The If else Statement in C#

The if else statement in C# is used to compare the two or more values and execute the true condition. The if else statement is commonly used along with the logical and comparison operators. Let's consider we have X and Y variables having certain values, then we can write condition for as.

  • If x is less than y : x > y 
  • If x is greater than y : x > y
  • If x is greater than or equals to y : x >= y 
  • If x is no equals to y : x != y 
  • If x is equals to y : x = = y 
  • If x is less than or equals to 10 and y is equals to 20 : x <= 10 && y = = 20 
  • If x is less than or equals to 20 or y is equals to 10 : x <= 20 || y = = 10

The preceding scenarios are some of the scenarios where if the condition is applicable, we can compare any values which are supported by C# datatypes.

The C# if Statement

The if statement can also be used without the else condition. In this scenario only the true code block is evaluated.

Syntax

if (condition) 
{
  // write code logic here if the condition is True
}

Example with integer value

if (x==10) 
{
Console.WriteLine("x is equals to 10");
}

Example with string value
 
if (x=="www.compilemode.com") 
{
Console.WriteLine("x is equals to www.compilemode.com");
}

The else Statement

The else statement is used to execute the False block if the given condition is not True. The if else statement gives more flexibility to perform the action in both the scenarios, whether either condition is true or false.

Syntax

if (condition)
{
  //Write logic here if the condition is True
} 
else 
{
   //Write logic here if the condition is False
}

Example

if (x=="www.compilemode.com") 
{
Console.WriteLine("x is equals to www.compilemode.com");
}
else
{
Console.WriteLine("x is not equals to www.compilemode.com");
}

The Multiple If-else If Statement

if (condition)
{
  //Write logic here if the condition is True
} 
else if(condition)
{
   //Write logic here if the condition is False
}
else
{
   //Write logic here if the condition is False
}

Example Multiple If-else If Statement C#

if (x=="Red")
{
 Console.WriteLine("The colour is red");
} 
else if(x=="Pink")
{
Console.WriteLine("The colour is pink");
}
else
{
   Console.WriteLine("The colour is not matching");
}

Let's write a simple C# console program by creating the console project using Visual Studio to demonstrate the above examples.

using System;

namespace ConsoleApp
{
    class Program
    {
        static void Main(string[] args)
        {
            //The if statement 
            int x = 100;
            int y = 90;

            if (x > y)
            {
                Console.WriteLine("The x is greater than y");
            }

            //The if else statement

            string Name = "www.compilemode.com";

            if (Name== "www.compilemode.com")
            {
                Console.WriteLine("The name is www.compilemode.com");
            }
            else
            {
                Console.WriteLine("The is not www.compilemode.com");
            }

            //The if- else if statement

            string a = "Red";
           
            if (a=="Pink")
            {
                Console.WriteLine("The colour is Pink");
            }
            else if (a=="Red")
            {
                Console.WriteLine("The colour is Red");
            }
            else
            {
                Console.WriteLine("The colour is not matching");
            }

            Console.ReadLine();
        }
    }
}

After running the above program, then the following output will be shown.

Summary


I hope this article is useful to understand the C# if else statement, Explore the www.compilemode.com C# tutorial category to learn basic about the C# language.

Fix Missing XML comment for Publicly Visible Type or Member

While working with swagger documentation in an API, we have to enable the XML file to be generated for documentation from the project setting. For this reason, all the public members in the project solution start giving the warning "CS1591: Missing XML comment for publicly visible type or member" 

we can simply define the XML comment for those members, and the same warning will disappear. But what about those members who are not a part of the swagger documentation? If we ignore them, then there will be lots of warnings in the code, which looks very ugly in the code.

In this article we will discuss how to resolve the "CS1591 missing XML comment for publicly visible type or member" warning by using one of three different solutions.

  • Create an XML Comment for All Public Members 
  • Disable Warning by Decorating Each Public Member
  • Disable all warnings at the project level. (Recommended)


Define XML Comment for All Public Members

The best way is to define the XML comment for all public members, whether it is part of the swagger UI document or not. Because of comments, our method becomes more meaningful, which helps new developers learn about the method by comments instead of going through the code and understanding the logic.


Another advantage of defining the XML comment is that when a developer implements any method in another class, it shows the IntelliSense about the method, which helps the developer to know what the functionality of the method is without navigating to the method defined class.

Suppress Warning by Decorating each Public Member

Even though the first approach has lots of advantages but it requires lots of time and it will increase the size of the project .

The alternate solution to the preceding mentioned problem is  we can suppress each public member by decorating with the following line, which does not require you to provide the XML comment.

#pragma warning disable CS1591


If you don't know the syntax, then simply follow the visual studio suggestion by keeping the mouse on a specific method or member.


Suppress all Warnings at Project Level

The previous two approaches necessitate a significant amount of time spent either defining the XML comment or disabling the warning for each project member.

To save time and minimise the swagger comment related warnings, we can disable these warnings at the project level itself with just one line of configuration. To achieve this, follow the following steps:
 
Right-click on the api project solution & find the properties 


or just use Alt + Enter by putting control of project solution which opens the following window, find the options by following the below image & enter the 1591 in the suppress warnings text box & save it.


Now check any class file. You will not see any warnings related to the swagger XML comment.


Summary

I hope this article helped you to fix Warning CS1591: Missing XML comment for publicly visible type or member.

Disable Swagger Missing XML comment warnings in ASP.NET Web Api

Background

While working with swagger documentation in an API we have to enabled the XML file to be generated for documentation from project setting and due to this reason all the pubic members in the project solution start giving the warnings "CS1591 Missing XML comment for publicly visible type or member" and if we specify the XML comment for those members then the same warning will be get disappeared but what for those members which are not a part of swagger documentation, If its ignore then their will be lots of warnings in the code which looks very uglier in the code, So in this article we will discus how to resolve the "CS1591 missing XML comment for publicly visible type or member" warning


CS1591 Missing XML Comment  Solution

  • Define XML Comment for All Public Members

As per me the best way is to define the XML comment for all public members whether its part of swagger UI document or not because of comments our method become more meaningful which help new developer to know about the method by comments instead of going through the code & understand the logic


Another Advantage for defining the XML comment is, when developer implementing the any method in another class its show's the IntelliSense about the method which help developer to know what is the functionality of method without navigating to the method defined class.

  • Suppress Warning by Decorating each Public Member

Even though first approach has lots of advantages but you don't want to invest lots of time & increase the size of the project we can suppress the each public member by decorating with following line
#pragma warning disable CS1591

If you don't know the syntax then simply follow the visual studio suggestion by keeping the mouse on specific method or member


  • Suppress all Warnings at Project Level

The previous two approaches requires lots of time either defining the XML comment or  disabling the warning of each member in project.
To save the time & minimize the swagger comment related warnings we can disable these warning at project level itself with the just one line configuration, to achieve follows the following steps
Right click on api project solution & find the properties 

or just use Alt + Enter by putting control of project solution which opens the following window, find the options by following the below image & enter the 1591 in the suppress warnings text box & save it.


Now check any class file, you will not be see any warnings related to the swagger XML comment


Summary
Hope this article helped you to fix Warning CS1591 Missing XML comment for publicly visible type or member. If you like the contents the support by using the following way.
Don't Forget To 

Multiple Layout Pages In ASP.NET MVC

Layout page shares the common design across all pages. It is similar to master page in ASP.NET. There are many methods which are listed below to change the layout page dynamically in ASP.NET MVC
  • While Adding View Page, Assign Layout Page .
  • Using View Start Page
I hope you have understand about the Layout page from preceding brief summary. Now let's implement it practically.

Step 1 : Create an ASP.NET MVC Application.

  1. "Start", then "All Programs" and select "Microsoft Visual Studio 2015".
  2. "File", then "New" and click "Project" then select "ASP.NET Web Application Template", then provide the Project a name as you wish and click on OK.
  3. Choose MVC empty application option and click on OK

Step 2:  Add user and admin controller controller.

Right click on Controller folder in the created MVC application and add the controller class as.

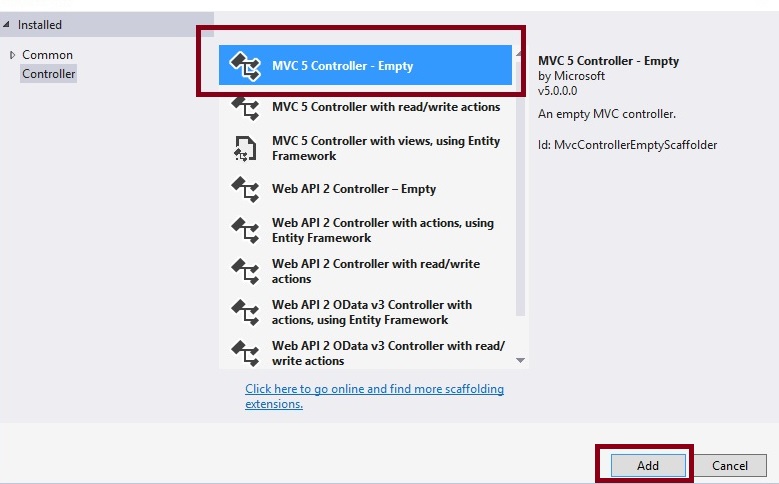
Now after selecting controller template, click on add button then the following window appears,


Now specify the controller name and click on add button then the UserController class will be added into the application , now follow the same steps and add theAdminController class,


After adding the two controller the solution explorer will be like the following,


The preceding two controller classes are added into the project which are User and Admin and create the following action methods in respective controller class.

UserController.cs

public class UserController : Controller  
    {  
        public ActionResult Login()  
        {  
            //write logic here  
            return View();  
        }  
    } 
AdminController.cs

public class AdminController : Controller  
   {  
       [HttpPost]  
       public ActionResult AddRole()  
       {  
           //write logic here  
           return View();  
       }  
   } 
For preceding two controllers we will use two different layout pages.

Step 3: Add Views and Layout pages

We can decide which layout page to be used while adding the view. It is same as deciding master page while adding ASP.NET web page. Let us follow the following steps to add layout page with view.
Click on View folder of created MVC application as,


As shown in preceding image, specify view name and check on use layout page option and click on add button then the following default layout page will be added into the solution explorer as,


The above is default layout page and will be added into the solution explorer. Now lets add another layout page named admin as in the following. Click on solution explorer and add layout page as,


Now click on add button, then added layout pages will look like as follows,


In the preceding image, two layout pages are added under shared folder which are AdminLayoutPage and Layout.

Step 4: Set layout pages to view

We have created view and layout pages. Now let us assign layout pages to the views. There are many ways to assign layout page to the view which are listed as in the following:
  • Using wizard
  • Using ViewStart page
  • Using view method
Using wizard

You can use wizard to set the layout page while adding the view, steps are as follows:
  • Right click on view folder and select view template as,

Specify the view name and check on Use a layout page and click on browse button. The following window will appear,


Now choose layout page from preceding available Layout pages and click on ok button. The layout page will  look like as follows,


Now click on add button then layout page reference added into the view page as,

So whenever you will add through wizard or manually the layout page reference need to be set in every view page where the layout page is needed.

Using ViewStart page

Adding reference of layout page in every page is very difficult and repetitive of code. Let us consider I have one controller which as twenty plus action method then each twenty views we need to add reference of layout page. Assume another requirement we need to set layout page according to condition basic or controller basic then we need to use Viewstart page.

Lets open the ViewStart.cshtm page and write the following code,

@{  
    string CurrentName = Convert.ToString(HttpContext.Current.Request.RequestContext.RouteData.Values["Controller"]);  
    dynamic Layout;  
    switch (CurrentName)  
    {  
        case "User":  
            Layout = "~/Views/Shared/_Layout.cshtml";  
            break;  
        default:  
            //Admin layout  
            Layout = "~/Views/Shared/_AdminLayoutPage.cshtml";  
            break;  
    }  
}  
Now run the application, the Login view will look like as follows in which we have used Layout page,

Now run AddRole view, Then the output will look like the following,

I hope from all the preceding examples, you have learned about layout pages in ASP.NET MVC.

Note:
  • Apply proper validation before using it in your project.
Summary

I hope this article is useful for all readers. If you have any suggestions, then please mention it in the comment section.

Related Tutorial

How To Create ASP.NET MVC Application

www.CodeNirvana.in

Protected by Copyscape
Copyright © Compilemode