Fix Missing XML comment for Publicly Visible Type or Member

While working with swagger documentation in an API, we have to enable the XML file to be generated for documentation from the project setting. For this reason, all the public members in the project solution start giving the warning "CS1591: Missing XML comment for publicly visible type or member" 

we can simply define the XML comment for those members, and the same warning will disappear. But what about those members who are not a part of the swagger documentation? If we ignore them, then there will be lots of warnings in the code, which looks very ugly in the code.

In this article we will discuss how to resolve the "CS1591 missing XML comment for publicly visible type or member" warning by using one of three different solutions.

  • Create an XML Comment for All Public Members 
  • Disable Warning by Decorating Each Public Member
  • Disable all warnings at the project level. (Recommended)


Define XML Comment for All Public Members

The best way is to define the XML comment for all public members, whether it is part of the swagger UI document or not. Because of comments, our method becomes more meaningful, which helps new developers learn about the method by comments instead of going through the code and understanding the logic.


Another advantage of defining the XML comment is that when a developer implements any method in another class, it shows the IntelliSense about the method, which helps the developer to know what the functionality of the method is without navigating to the method defined class.

Suppress Warning by Decorating each Public Member

Even though the first approach has lots of advantages but it requires lots of time and it will increase the size of the project .

The alternate solution to the preceding mentioned problem is  we can suppress each public member by decorating with the following line, which does not require you to provide the XML comment.

#pragma warning disable CS1591


If you don't know the syntax, then simply follow the visual studio suggestion by keeping the mouse on a specific method or member.


Suppress all Warnings at Project Level

The previous two approaches necessitate a significant amount of time spent either defining the XML comment or disabling the warning for each project member.

To save time and minimise the swagger comment related warnings, we can disable these warnings at the project level itself with just one line of configuration. To achieve this, follow the following steps:
 
Right-click on the api project solution & find the properties 


or just use Alt + Enter by putting control of project solution which opens the following window, find the options by following the below image & enter the 1591 in the suppress warnings text box & save it.


Now check any class file. You will not see any warnings related to the swagger XML comment.


Summary

I hope this article helped you to fix Warning CS1591: Missing XML comment for publicly visible type or member.

Display Data From Hosted Web API REST Service in ASP.NET MVC Using HttpClient

Many reader asking me to write on how to get data from remotely hosted web API REST service , So I have decided to write this article to explain step by step how to display data from hosted web API REST Service in ASP.NET MVC using HttpClient. To demonstrate this lets create simple ASP.NET MVC application
If are new and wants to learn web API REST service from creating to hosting to consuming in client application.

In this article, we will use the same hosted Web API REST service  to consume in our created ASP.NET MVC web application. Now, let's start consuming Web API REST service in ASP.NET MVC application step by step.

Step 1 - Create ASP.NET MVC Application.

  1. "Start", followed by "All Programs" and select "Microsoft Visual Studio 2015".
  2. Click "File", followed by "New" and click "Project". Select "ASP.NET Web Application Template", provide the Project a name as you wish and click OK.
  3. After clicking, the following Window will appear. Choose empty project template and check on MVC option.

The preceding step creates the simple empty ASP.NET MVC application without Model, View, and Controller, The Solution Explorer of created web application will look like the following.


Step 2 - Install HttpClient library from NuGet


We are going to use HttpClient to consume the Web API REST Service, so we need to install this library from NuGet Package Manager .


What is HttpClient ?


HttpClient is base class which is responsible to send HTTP request and receive HTTP response resources i.e from REST services.


To install HttpClient, right click on Solution Explorer of created application and search for HttpClient, as shown in the following image.


Step 3 - Install WebAPI.Client library from NuGet

This package is used for formatting and content negotiation which provides support for System.Net.Http. To install, right click on Solution Explorer of created application and search for WebAPI.Client, as shown in following image.


Now, click on "Install" button after choosing the appropriate version. It will get installed after taking few seconds depending on your internet speed. We have installed necessary NuGet packages to consume Web API REST services in web application. I hope you have followed the same steps.

Step 4 - Create Model Class 

Now, let us create the Model class named Employee.cs  or as you wish, by right clicking on Models folder with same number of entities which are exposing by our hosted Web API REST service to exchange the data. The code snippet of created Employee.cs class will look like this.

    public class Employee  
    {  
        public int Id { get; set; }  
        public string Name { get; set; }  
                 
        public string City { get; set; }  
      
    }   

Step 5 - Add Controller Class

Now, let us add ASP.NET MVC controller, as shown in the screenshot given below.


After clicking Add button, it will show in the Window. Specify the Controller name as Home with suffix Controller. Now, let's modify the default code of Home controller . Our hosted Web API REST Service includes these two methods, as given below.

  • GetAllEmployees (GET )
  • GetEmployeeById (POST ) which takes id as input parameter 
The url of the hosted web API REST Service is 

  http://192.168.95.1:5555/api/Employee/GetAllEmployees

In the preceding url
  • http://localhost:56290 Is the base address of web API service, It can be different as per your server.
  • api It is the used to differentiate between Web API controller and MVC controller request .
  • Employee This is the Web API controller name.
  • GetAllEmployees This is the Web API method which returns the all employee list.
After modifying the code of Homecontroller class, the code will look like the following.

Homecontroller.cs
using ConsumingWebAapiRESTinMVC.Models;  
using Newtonsoft.Json;  
using System;  
using System.Collections.Generic;  
using System.Net.Http;  
using System.Net.Http.Headers;  
using System.Threading.Tasks;  
using System.Web.Mvc;  
  
namespace ConsumingWebAapiRESTinMVC.Controllers  
{  
    public class HomeController : Controller  
    {  
        //Hosted web API REST Service base url  
        string Baseurl = "http://192.168.95.1:5555/";      
        public async Task<ActionResult> Index()  
        {  
            List<Employee> EmpInfo = new List<Employee>();  
              
            using (var client = new HttpClient())  
            {  
                //Passing service base url  
                client.BaseAddress = new Uri(Baseurl);  
  
                client.DefaultRequestHeaders.Clear();  
                //Define request data format  
                client.DefaultRequestHeaders.Accept.Add(new MediaTypeWithQualityHeaderValue("application/json"));  
                  
                //Sending request to find web api REST service resource GetAllEmployees using HttpClient  
                HttpResponseMessage Res = await client.GetAsync("api/Employee/GetAllEmployees");  
  
                //Checking the response is successful or not which is sent using HttpClient  
                if (Res.IsSuccessStatusCode)  
                {  
                    //Storing the response details recieved from web api   
                    var EmpResponse = Res.Content.ReadAsStringAsync().Result;  
  
                    //Deserializing the response recieved from web api and storing into the Employee list  
                    EmpInfo = JsonConvert.DeserializeObject<List<Employee>>(EmpResponse);  
  
                }  
                //returning the employee list to view  
                return View(EmpInfo);  
            }  
        }  
    }  
}  

I hope, you have gone through the same steps and understood about the how to use and call Web API REST service resource using HttpClient.


Step 6 - Create strongly typed View

Now, right click on Views folder of the created application and create strongly typed View named by Index by choosing Employee class to display the employee list from hosted web API REST Service, as shown in the following image.


Now, click on "Add" button. It will create View named index after modifying the default code. The code snippet of the Index View looks like the following.


Index.cshtml 
@model IEnumerable<ConsumingWebAapiRESTinMVC.Models.Employee>  
  
@{  
    ViewBag.Title = "www.compilemode.com";  
}  
  
<div class="form-horizontal">  
  
    <hr />  
    <div class="form-group">  
  
  
        <table class="table table-responsive" style="width:400px">  
            <tr>  
                <th>  
                    @Html.DisplayNameFor(model => model.Name)  
                </th>  
                <th>  
                    @Html.DisplayNameFor(model => model.City)  
                </th>  
                  
            </tr>  
  
            @foreach (var item in Model) {  
                <tr>  
                    <td>  
                        @Html.DisplayFor(modelItem => item.Name)  
                    </td>  
                    <td>  
                        @Html.DisplayFor(modelItem => item.City)  
                    </td>  
                      
                </tr>  
}  
  
        </table>  
    </div>  
</div>  

The preceding View will display all employees list . Now, we have done all the coding.

Step 7 - Run the Application

After running the Application, the employee list from hosted web API REST service will look like this.


I hope, from the above examples, you have learned how to consume Web API REST Service in ASP.NET MVC using HttpClient.


Note

  • This article is just guideline on how to consume Web API REST Service in ASP.NET MVC application using HttpClient .

  • In this article, the optimization is not covered in depth; do it as per your skills.

Summary

I hope, this article is useful for all the readers. If you have any suggestions, please contact me.

Video : Creating ASP.NET Web API REST Service Step by Step

This video tutorial guide you step  by step to create ASP.NET Web API REST Service  which covers the following topics
  • Creating Web API REST Service Step by step.
  • Adding Web API Controller Class
  • Adding Model Class .
  • Configuring Web API routing .
  • Configuring Multiple Get POST methods inside the Web API controller .
  • Getting JSON Data From Service.
Now Let's watch 


Summary 
I hope this video tutorial is useful for all viewers , If you like this video then , don't forget to subscribe compilemode.com YouTube Channel.

SubScribe To Youtube Channel

Display Data From DataBase in ASP.NET Using Web API And jQuey Json

I have often read the common question in forum posts as how to insert the ASP.Net form data into a database and display it using the Web API. So based on the this requirement, I have decided to write this article. Let us start creating an application so beginners can also understand.

Step 1 : Create Table and Stored Procedure

First create the table named Employee using the following script:

CREATE TABLE [dbo].[Employee](    
    [Id] [int] IDENTITY(1,1) NOT NULL,    
    [FirstName] [varchar](50) NULL,    
    [LastName] [varchar](50) NULL,    
    [Company] [varchar](50) NULL,    
 CONSTRAINT [PK_Employee] PRIMARY KEY CLUSTERED     
(    
    [Id] ASC    
)WITH (PAD_INDEX = OFF, STATISTICS_NORECOMPUTE = OFF, IGNORE_DUP_KEY = OFF, ALLOW_ROW_LOCKS = ON, ALLOW_PAGE_LOCKS = ON) ON [PRIMARY]    
) ON [PRIMARY]   

Now create a Stored Procedure to insert the data as:

Create Procedure [dbo].[InsertData]    
(    
@FName varchar(50),    
@Lname Varchar(50),    
@Compnay varchar(50)    
    
)    
as    
begin    
    
INSERT INTO [dbo].[Employee]    
           ([FirstName]    
           ,[LastName]    
           ,[Company])    
     VALUES    
           (    
           @FName,    
           @Lname,    
           @Compnay    
          )    
End 

Step 2 : Create Web Application

Now Let us create the sample web application as follows:
  1. "Start" -> "All Programs" -> "Microsoft Visual Studio 2010".
  2. "File" -> "New Project" -> "C#" -> "Empty Project" (to avoid adding a master page).
  3. Provide the website a name such as "DisplayingFormDataUsingWebAPI" or another as you wish and specify the location.
  4. Then right-click on the Solution Explorer -> "Add New Item" -> Add Web Form.
  5. Drag and drop three text boxes and one Button onto the <form> section of the Default.aspx page.
Now the default.aspx page source code will be as follows.

<%@ Page Language="C#" AutoEventWireup="true" CodeBehind="Default.aspx.cs" Inherits="InsertingFormDataUsingWebAPI.Default" %>      
          
    <!DOCTYPE html PUBLIC "-//W3C//DTD XHTML 1.0 Transitional//EN" "http://www.w3.org/TR/xhtml1/DTD/xhtml1-transitional.dtd">      
          
    <html xmlns="http://www.w3.org/1999/xhtml">      
    <head id="Head1" runat="server">      
        <title>Article  by Vithal Wadje</title>      
             
    </head>      
    <body style="background-color:Navy;color:White">      
        <form id="form1" runat="server">      
        <br /><br />      
        <table>      
            <tr>      
                <td>      
                    First Name      
                </td>      
                <td>      
                    <asp:TextBox runat="server" ID="txtFirstName" />      
                </td>      
            </tr>      
            <tr>      
                <td>      
                    Last Name      
                </td>      
                <td>      
                    <asp:TextBox runat="server" ID="txtLastName" />      
                </td>      
            </tr>      
            <tr>      
                <td>      
                    Company      
                </td>      
                <td>      
                    <asp:TextBox runat="server" ID="txtCompany" />      
                </td>      
            </tr>      
            <tr>      
                <td>      
                </td>      
                <td>      
                    <asp:Button Text="Save" runat="server" ID="btnSave" />      
                </td>      
            </tr>      
        </table>      
        <br />      
              
        </form>      
    </body>      
    </html>  

Step 3 : Create Property Class

We have a .aspx Web form to insert the records. Now create the Property class named Employee class as in the following:

    public class Employee     
    {    
       public string FirstName { get; set; }    
       public string LastName { get; set; }    
       public string Company { get; set; }    
      
    }   

Step 4: Add Web API Controller Class

We created the preceding properties as in our table structure to insert the preceding employee details into the database. Now let us add a web API controller class into the web application by right-clicking on the project in the Solution Explorer and rename it EmpController with controller suffix.

Step 5: Create Repository Class to add and view records

Now add the following method into the Repository Class named AddEmployee and GetAllEmp that does all the data access related activities:

public IEnumerable<Employee> GetAllEmp()  
     {  
         connection();  
   
       com = new SqlCommand("select *from Employee", con);  
       com.CommandType = CommandType.Text;  
         SqlDataAdapter da = new SqlDataAdapter(com);  
         DataTable dt = new DataTable();  
         con.Open();  
         da.Fill(dt);  
         con.Close();  
  
         foreach (DataRow row in dt.Rows)  
         {  
             yield return new Employee  
             {  
                 Id = Convert.ToInt32(row["Id"]),  
                 FirstName = Convert.ToString(row["FirstName"]),  
                 LastName = Convert.ToString(row["LastName"]),  
                 Company = Convert.ToString(row["Company"]),  
  
             };  
         }  
  
     }  
     public string AddEmployees(Employee Emp)  
     {  
         connection();  
         com = new SqlCommand("InsertData", con);  
         com.CommandType = CommandType.StoredProcedure;  
         com.Parameters.AddWithValue("@FName", Emp.FirstName);  
         com.Parameters.AddWithValue("@Lname", Emp.LastName);  
         com.Parameters.AddWithValue("@Compnay", Emp.Company);  
         con.Open();  
         int i = com.ExecuteNonQuery();  
         con.Close();  
       
         if (i >= 1)  
         {  
             return "New Employee Added Successfully"; 
         }  
         else  
         {  
             return "Employee Not Added"; 
         }         
     }

The entire EmpRepository class file will be as follows:

    using System;  
    using System.Collections.Generic;  
    using System.Linq;  
    using System.Web;  
    using System.Data.SqlClient;  
    using System.Configuration;  
    using System.Data;  
      
    namespace DisplayingFormDataUsingWebAPI  
    {  
        public class EmpRepository  
        {  
      
            private SqlConnection con;  
            private SqlCommand com;  
            
            private void connection()  
            {  
                string constr = ConfigurationManager.ConnectionStrings["getconn"].ToString();  
                con = new SqlConnection(constr);  
      
      
            }  
            public IEnumerable<Employee> GetAllEmp()  
            {  
                connection();      
              com = new SqlCommand("select *from Employee", con);  
              com.CommandType = CommandType.Text;  
                SqlDataAdapter da = new SqlDataAdapter(com);  
                DataTable dt = new DataTable();  
                con.Open();  
                da.Fill(dt);  
                con.Close();  
      
                foreach (DataRow row in dt.Rows)  
                {  
                    yield return new Employee  
                    {  
                        Id = Convert.ToInt32(row["Id"]),  
                        FirstName = Convert.ToString(row["FirstName"]),  
                        LastName = Convert.ToString(row["LastName"]),  
                        Company = Convert.ToString(row["Company"]),  
      
                    };  
                }  
      
            }  
            public string AddEmployees(Employee Emp)  
            {  
                connection();  
                com = new SqlCommand("InsertData", con);  
                com.CommandType = CommandType.StoredProcedure;  
                com.Parameters.AddWithValue("@FName", Emp.FirstName);  
                com.Parameters.AddWithValue("@Lname", Emp.LastName);  
                com.Parameters.AddWithValue("@Compnay", Emp.Company);  
                con.Open();  
                int i = com.ExecuteNonQuery();  
                con.Close();  
              
                if (i >= 1)  
                {  
                    return "New Employee Added Successfully";  
      
                }  
                else  
                {  
                    return "Employee Not Added";  
      
                }            
            }  
        }  
    } 

Step 6: Create Post and Get method

Create a Post and Get method in the ASP.Net Web API Controller Class. Open the EmpController class that we created, delete the existing methods and create the AddEmployees and GetAllEmp method and call the EmpRepository class method as in the following:

    //creating the object of EmpRepository class  
          static EmpRepository repository = new EmpRepository();  
      
          public IEnumerable<Employee> GetAllEmp()  
          {  
              var users = repository.GetAllEmp();  
              return users;  
          }  
          public string AddEmployees(Employee Emp)  
          {  
              //calling EmpRepository Class Method and storing Repsonse   
              var response = repository.AddEmployees(Emp);  
              return response;  
      
          } 

You have seen that the preceding EmpController class is inherited from the ApiController class and we have created the method AddEmployee that calls the EmpRepository class method named AddEmployees. The entire EmpController class will be as follows:

    using System;  
    using System.Collections.Generic;  
    using System.Linq;  
    using System.Net;  
    using System.Net.Http;  
    using System.Web.Http;  
      
    namespace DisplayingFormDataUsingWebAPI  
    {  
        public class EmpController : ApiController  
        {  
      
            //creating the object of EmpRepository class  
            static EmpRepository repository = new EmpRepository();  
      
            public IEnumerable<Employee> GetAllEmp()  
            {  
                var users = repository.GetAllEmp();  
                return users;  
            }  
            public string AddEmployees(Employee Emp)  
            {  
                //calling EmpRepository Class Method and storing Repsonse   
                var response = repository.AddEmployees(Emp);  
                return response;  
      
            }  
      
        }  
    } 

Step 7: Call ASP.Net Web API Controller method

Call the ASP.Net Web API Controller method from the .aspx page using JSON. Now we need to call the Web API controller method from the .aspx page. To do this we need to create a JSON method using jQuery as in the following:

    <script type="text/javascript">  
         function GetAllEmp() {  
               $.getJSON("api/Emp", function (data) {  
                   $('#bindemp').empty();  
                   $.each(data, function (key, val) {  
                     
                       var row = "<tr><td>" + val.Id + "</td> <td></td>  <td>" + val.FirstName + "  " + val.LastName + "</td> <td></td> <td>" + val.Company +  
                           "</td></tr>";  
      
                       $(row).appendTo($('#bindemp'));  
      
                   });  
               });  
           }        
           function AddEmp() {  
               
               var Emp = {};  
               Emp.FirstName = $("#txtFirstName").val();  
               Emp.LastName = $("#txtLastName").val();           
               Emp.Company = $("#txtCompany").val();  
      
               $.ajax({  
                   url:"<%=Page.ResolveUrl("/api/Emp/AddEmployees")%>",   
                   type: "POST",  
                   contentType: "application/json;charset=utf-8",  
                   data: JSON.stringify(Emp),  
                   dataType: "json",  
                   success: function (response) {  
      
                       alert(response);  
                    GetAllEmp();
                   },  
      
                   error: function (x, e) {  
                       alert('Failed');  
                       alert(x.responseText);  
                       alert(x.status);  
      
                   }  
               });  
           }
           $(document).ready(function ()  
            {  
      
              GetAllEmp();  
      
               $("#btnSave").click(function (e) {
                   AddEmp();  
                   e.preventDefault();
               });
           });  
      
       </script> 


Now the entire default.aspx page will be as follows:


    <%@ Page Language="C#" AutoEventWireup="true" CodeBehind="Default.aspx.cs" Inherits="DisplayingFormDataUsingWebAPI.Default" %>  
      
    <!DOCTYPE html PUBLIC "-//W3C//DTD XHTML 1.0 Transitional//EN" "http://www.w3.org/TR/xhtml1/DTD/xhtml1-transitional.dtd">  
      
    <html xmlns="http://www.w3.org/1999/xhtml">  
    <head id="Head1" runat="server">  
        <title>Article  by Vithal Wadje</title>  
        <script src="jquery-1.7.1.js" type="text/javascript"></script>  
          
        <script type="text/javascript">  
          function GetAllEmp() {  
                $.getJSON("api/Emp", function (data) {  
                    $('#bindemp').empty();  
                    $.each(data, function (key, val) {  
                      
                        var row = "<tr><td>" + val.Id + "</td> <td></td>  <td>" + val.FirstName + "  " + val.LastName + "</td> <td></td> <td>" + val.Company +  
                            "</td></tr>";  
      
                        $(row).appendTo($('#bindemp'));  
      
                    });  
                });  
            }  
             
            function AddEmp() {  
                
                var Emp = {};  
                Emp.FirstName = $("#txtFirstName").val();  
                Emp.LastName = $("#txtLastName").val();           
                Emp.Company = $("#txtCompany").val();  
      
                $.ajax({  
                    url:"<%=Page.ResolveUrl("/api/Emp/AddEmployees")%>",   
                    type: "POST",  
                    contentType: "application/json;charset=utf-8",  
                    data: JSON.stringify(Emp),  
                    dataType: "json",  
                    success: function (response) {  
      
                        alert(response);  
                     GetAllEmp();       
      
                    },  
                    error: function (x, e) {  
                        alert('Failed');  
                        alert(x.responseText);  
                        alert(x.status);  
                    }  
                });
      
            }
      
            $(document).ready(function ()  
             {
               GetAllEmp();
                $("#btnSave").click(function (e) {      
      
                    AddEmp();  
                    e.preventDefault();
                });
            });
        </script>  
    </head>  
    <body style="background-color:navy;color:White">  
        <form id="form1" runat="server">  
        <br /><br />  
        <table>  
            <tr>  
                <td>  
                    First Name  
                </td>  
                <td>  
                    <asp:TextBox runat="server" ID="txtFirstName" />  
                </td>  
            </tr>  
            <tr>  
                <td>  
                    Last Name  
                </td>  
                <td>  
                    <asp:TextBox runat="server" ID="txtLastName" />  
                </td>  
            </tr>  
            <tr>  
                <td>  
                    Company  
                </td>  
                <td>  
                    <asp:TextBox runat="server" ID="txtCompany" />  
                </td>  
            </tr>  
            <tr>  
                <td>  
                </td>  
                <td>  
                    <asp:Button Text="Save" runat="server" ID="btnSave" />  
                </td>  
            </tr>  
            </table>  
            <br />  
            <table>  
            
            <thead>  
                <tr>  
                    <td>  
                        Id  
                    </td>  
                   <td></td>  
                   
                    <td>  
                      Name  
                    </td>  
                     <td></td>  
                    <td>  
                        Company  
                    </td>  
                </tr>  
            </thead>  
           
            <tbody id="bindemp">  
            </tbody>  
        </table>  
        
        </form>  
    </body>  
    </html> 

Now run the application, the UI will be as follows:


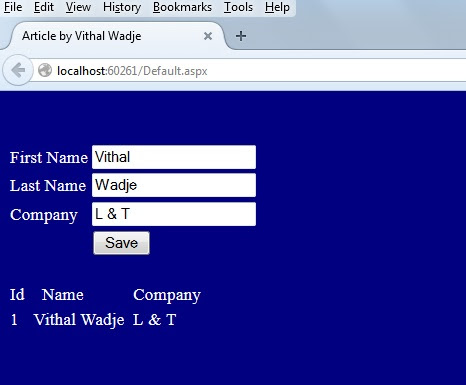
Now enter some records into the preceding fields and click on the Save button. Then the following screen shows the added records.


Now add another record.


Now you have seen how the insertion of records into the database and display it using Web API with Web Forms works.

Notes

  • Do a proper validation such as date input values when implementing.
  • Make the changes in the web.config file depending on your server details for the connection string.
Summary

You have learned here how to insert records into the database and display it using the ASP.Net Web API with Web Forms. I hope this article is useful for all readers. If you have a suggestion then please contact me.

Creating ASP.NET Web API REST Service Step by Step

Today's application need to be communicated on all cross platforms to fulfill the need of today's modern application, to fulfill these requirement lots of technologies are invented and they are used as per requirement. The Web API is one of the latest technology to fulfill the requirement of enterprise application.
Let's learn about it step by step:
What is ASP.NET Web API
The ASP.NET Web API is one of the Microsoft open source technology to build the powerful REST Services which will communicate across all platform and devices over HTTP.
Let us implement it practically by creating one sample application.

Step 1 :
Create ASP.NET Web API Service
  1. "Start", then "All Programs" and select "Microsoft Visual Studio 2015".
  2. "File", then "New" and click "Project", then select "ASP.NET Web Application Template" and provide the Project a name as you wish and click on OK, then the following windows will appear; select empty template and check on Web API as in the following image.


  3. Choose MVC empty application option and click OK.
  4. Now after adding the MVC project, the Solution Explorer will look like the following:


After creating the ASP.NET Web API project, the preceding folder structure and files are added into the project by default which are same as MVC project, so let us learn about them in brief as in the following:

  • App_Start folder
    This folder contains the application configuration details such as routing, authentication, filtering of URL and so on.
  • Controller
    This folder contains the controller and their methods. The controller is responsible for processing the user request and return output as a view.
  • Models
    This folder contains the entities or properties used to store the input values.
Step 2 : Create Model Class.

Right click on Model folder in the created Web API application, give the class name EmpModel or as you wish and click on OK.


Now write the following code into the EmpModel Class.
EmpModel.cs
public class EmpModel  
    {  
        public string Name { get; set; }  
        public string City { get; set; }  
    } 

Step 3 : Add Web API Controller.

Right click on Controller folder in the created Web API application and Web API 2 Empty controller as in the following,


Now click on add and give the class name Home or as you wish and click OK as:


Now we have added Model class and web API controller class. Let's create the method into the HomeController class as in the following,

HomeController.cs
using System;  
using System.Web.Http;  
  
namespace CreatingWebAPIService.Controllers  
{  
    public class HomeController : ApiController  
    {  
        [HttpPost]  
        public bool AddEmpDetails()  
        {  
            return true;  
            //write insert logic  
  
        }  
        [HttpGet]  
        public string GetEmpDetails()  
        {  
            return "Vithal Wadje";  
  
        }  
        [HttpDelete]  
        public string DeleteEmpDetails(string id)  
        {  
            return "Employee details deleted having Id " + id;  
  
        }  
        [HttpPut]  
        public string UpdateEmpDetails(string Name, String Id)  
        {  
            return "Employee details Updated with Name " + Name + " and Id " + Id;  
  
        }  
    }  
  
}  
In this above code we have created four methods for Insert, Update, Display and delete the records .The above web API controller methods defined with HTTP methods which are the following,
  • GET: Get the resource (Records) from particular source such as SQL database.
  • POST: Used to insert the records into the particular source such as SQL, Oracle database.
  • PUT: Used to modify the resource or records.
  • DELETE : Used to delete the specific resource or record from particular source.
 Step 4: Run the application.
Now everything is ready lets run the application, it will throw the following error:


The reason of above error is we are not following the url structure which are set into the routing of web API application. The following is the default URL structure of ASP.NET Web API defined into the WebApiConfig.cs file.


From the above routing structure, we can access the resource using  url format i.e Base url+api+apicontroller. Unlike MVC controller the web controller by default access all the methods just using controller name. Now our service is ready. Let's test it using REST client browser extension because browser only supports Get request directly from URL not others .

Our REST Service URL will be http://localhost:56290/api/Home which is described as follows,
  • http://localhost:56290: Is the base address of web API service, It can be different as per your server.
  • api: It is the used to differentiate between Web API controller and MVC controller request .
  • Home: This is the Web API controller name.
Step 5: Testing Web API REST service using REST client.

 Now let us test the application using REST client as:

POST:


In the above image Web API REST Service, HTTP POST method returns the 200 Status code means REST service is successfully executed.
GET Method


In the above image Web API REST Service, HTTP GET method returns the 200 Status code means REST service is successfully executed and return the XML format output.

Note
  • The  Web API REST service by default return the output as per browser default message header such as XML or JSON.
The above XML output return in Firefox browser., Now let's change the browser as IE, then output will return in JSON format as in the following,


From the above output its clear that output format by default depend on browser message format header.
Delete Method

In the above image Web API REST Service, HTTP Delete method returns the 200 Status code means REST service is successfully executed and return the XML format output. I hope from the preceding examples we learned how to create Web API REST Service.

Note:
  • Download the Zip file of the sample application for a better understanding.
  • In my next article, Introduction ASP.NET Web API we will learn what is Web API REST Service, When and where to use Web API REST Service.
Summary

I hope this article is useful for all readers. If you have any suggestions, then please mention it in the comment section.

Inserting ASP.NET Form Data into DataBase Using Web API REST

I have often read the common question in forum posts of how to insert the ASP.Net form data using the Web API into a database. But no one has provided the proper solution. So based on the preceding requirement, I have decided to write this article. Let us start creating an application so beginners can also understand.

Step 1 : Create Table and Stored Procedure

First create the table named Employee using the following script:


CREATE TABLE [dbo].[Employee](  
    [Id] [int] IDENTITY(1,1) NOT NULL,  
    [FirstName] [varchar](50) NULL,  
    [LastName] [varchar](50) NULL,  
    [Company] [varchar](50) NULL,  
 CONSTRAINT [PK_Employee] PRIMARY KEY CLUSTERED   
(  
    [Id] ASC  
)WITH (PAD_INDEX = OFF, STATISTICS_NORECOMPUTE = OFF, IGNORE_DUP_KEY = OFF, ALLOW_ROW_LOCKS = ON, ALLOW_PAGE_LOCKS = ON) ON [PRIMARY]  
) ON [PRIMARY]  
 
The design view of the table will look as follows:


Now create a Stored Procedure to insert the data as:


Create Procedure [dbo].[InsertData]  
(  
@FName varchar(50),  
@Lname Varchar(50),  
@Compnay varchar(50)  
  
)  
as  
begin  
  
INSERT INTO [dbo].[Employee]  
           ([FirstName]  
           ,[LastName]  
           ,[Company])  
     VALUES  
           (  
           @FName,  
           @Lname,  
           @Compnay  
          )  
End

Step 2 : Create Web Application

Now Let us create the sample web application as follows:
  1. "Start" -> "All Programs" -> "Microsoft Visual Studio 2010".
  2. "File" -> "New Project" -> "C#" -> "Empty Project" (to avoid adding a master page).
  3. Provide the website a name such as "InsertingFormDataUsingWebAPI" or another as you wish and specify the location.
  4. Then right-click on the Solution Explorer -> "Add New Item" -> Add Web Form.
  5. Drag and drop three text boxes and one Button onto the <form> section of the Default.aspx page.
Now the default.aspx page source code will be as follows.

<%@ Page Language="C#" AutoEventWireup="true" CodeBehind="Default.aspx.cs" Inherits="InsertingFormDataUsingWebAPI.Default" %>  
  
<!DOCTYPE html PUBLIC "-//W3C//DTD XHTML 1.0 Transitional//EN" "http://www.w3.org/TR/xhtml1/DTD/xhtml1-transitional.dtd">  
  
<html xmlns="http://www.w3.org/1999/xhtml">  
<head id="Head1" runat="server">  
    <title>Article  by Vithal Wadje</title>  
     
</head>  
<body style="background-color:Navy;color:White">  
    <form id="form1" runat="server">  
    <br /><br />  
    <table>  
        <tr>  
            <td>  
                First Name  
            </td>  
            <td>  
                <asp:TextBox runat="server" ID="txtFirstName" />  
            </td>  
        </tr>  
        <tr>  
            <td>  
                Last Name  
            </td>  
            <td>  
                <asp:TextBox runat="server" ID="txtLastName" />  
            </td>  
        </tr>  
        <tr>  
            <td>  
                Company  
            </td>  
            <td>  
                <asp:TextBox runat="server" ID="txtCompany" />  
            </td>  
        </tr>  
        <tr>  
            <td>  
            </td>  
            <td>  
                <asp:Button Text="Save" runat="server" ID="btnSave" />  
            </td>  
        </tr>  
    </table>  
    <br />  
      
    </form>  
</body>  
</html> 

Step 3 : Create Property Class

We have a .aspx Web form to insert the records. Now create the Property class Named Employee class as in the following:

public class Employee   
{  
   public string FirstName { get; set; }  
   public string LastName { get; set; }  
   public string Company { get; set; }  
  
}  

Step 4: Add Web API Controller Class

We created the preceding properties as in our table structure to insert the preceding employee details into the database. Now let us add a web API controller class into the web application by right-clicking on the project in the Solution Explorer and rename it to EmpController with controller suffix as:


Step 5: Create Repository Class

Now add the following method into the Repository Class named AddEmployee that does all the data access related activities:

public string AddEmployees(Employee Emp)    
{    
    connection();    
    com = new SqlCommand("InsertData", con);    
    com.CommandType = CommandType.StoredProcedure;    
    com.Parameters.AddWithValue("@FName", Emp.FirstName);    
    com.Parameters.AddWithValue("@Lname", Emp.LastName);    
    com.Parameters.AddWithValue("@Compnay", Emp.Company);    
    con.Open();    
    int i = com.ExecuteNonQuery();    
    con.Close();    
    if (i >= 1)    
    {    
        return "New Employee Added Successfully";    
  
    }    
    else    
    {    
        return "Employee Not Added";    
  
    }    
}   

The entire EmpRepository class file will be as follows:

using System;  
using System.Collections.Generic;  
using System.Linq;  
using System.Web;  
using System.Data.SqlClient;  
using System.Configuration;  
using System.Data;  
  
namespace InsertingFormDataUsingWebAPI  
{  
    public class EmpRepository  
    {  
  
        private SqlConnection con;  
        private SqlCommand com;  
        
        private void connection()  
        {  
            string constr = ConfigurationManager.ConnectionStrings["getconn"].ToString();  
            con = new SqlConnection(constr);  
  
  
        }  
  
        public string AddEmployees(Employee Emp)  
        {  
            connection();  
            com = new SqlCommand("InsertData", con);  
            com.CommandType = CommandType.StoredProcedure;  
            com.Parameters.AddWithValue("@FName", Emp.FirstName);  
            com.Parameters.AddWithValue("@Lname", Emp.LastName);  
            com.Parameters.AddWithValue("@Compnay", Emp.Company);  
            con.Open();  
            int i = com.ExecuteNonQuery();  
            con.Close();  
            if (i >= 1)  
            {  
                return "New Employee Added Successfully";  
  
            }  
            else  
            {  
                return "Employee Not Added";  
  
            }  
        }  
    }  
} 

Step 6: Create Post method

Create a Post method in the ASP.Net Web API Controller Class. Open the EmpController class that we created, delete the existing methods and create the AddEmployees Method and call the EmpRepository class method as in the following:

public class EmpController : ApiController  
{  
  
    //creating the object of EmpRepository class  
    static EmpRepository repository = new EmpRepository();  
  
  
    public string AddEmployees(Employee Emp)  
    {  
        //calling EmpRepository Class Method and storing Repsonse   
        var response = repository.AddEmployees(Emp);  
        return response;  

    }  
  
}  


You have seen that the preceding EmpController class is inherited from the ApiController class and we have created the method AddEmployee that the calls EmpRepository class method named AddEmployees.

The entire EmpController class will be as follows:

using System;  
using System.Collections.Generic;  
using System.Linq;  
using System.Net;  
using System.Net.Http;  
using System.Web.Http;  
  
namespace InsertingFormDataUsingWebAPI  
{  
    public class EmpController : ApiController  
    {  
  
        //creating the object of EmpRepository class  
        static EmpRepository repository = new EmpRepository();  
  
  
        public string AddEmployees(Employee Emp)  
        {  
            //calling EmpRepository Class Method and storing Repsonse   
            var response = repository.AddEmployees(Emp);  
            return response;  
  
        }  
  
    }  
}  
 

Step 7: Configure  ASP.Net Web API routing

We need to configure the routing for incoming requests. Let us create WebApiConfig.cs by right-clicking on the project in the Solution Explorer and create the following method as in the following:


public static void Register(HttpConfiguration config)  
       {  
  
  
           config.Routes.MapHttpRoute(  
               name: "DefaultApi",  
               routeTemplate: "api/{controller}/{id}",  
               defaults: new { id = RouteParameter.Optional }  
           );  
 
       }  


The entire WebApiConfig.cs will be as follows:


using System.Web.Http;  
  
namespace InsertingFormDataUsingWebAPI  
{  
    public class WebApiConfig  
    {  
        public static void Register(HttpConfiguration config)  
        {  
  
  
            config.Routes.MapHttpRoute(  
                name: "DefaultApi",  
                routeTemplate: "api/{controller}/{id}",  
                defaults: new { id = RouteParameter.Optional }  
            ); 
       }  
  
    }   

Step 8: Call the Register method

Call the Register method from the Global.asax file. Add the Global.asax file to the ASP.Net web application if not already present and call the Register method on Application_Start Event as in the following:

protected void Application_Start(object sender, EventArgs e)  
{  
     WebApiConfig.Register(GlobalConfiguration.Configuration);  
         
}  

    Step 9: Call ASP.Net Web API Controller method

    Call the ASP.Net Web API Controller method from the .aspx page using JSON. Now we need to call the Web API controller method from the .aspx page. To do this we need to create a JSON method using jQuery as in the following:

    function AddEmp() {  
             
       var Emp = {};  
       Emp.FirstName = $("#txtFirstName").val();  
       Emp.LastName = $("#txtLastName").val();           
       Emp.Company = $("#txtCompany").val();    
      
     
       $.ajax({  
          url:"<%=Page.ResolveUrl("/api/Emp/AddEmployees")%>",   
          type: "POST",  
          contentType: "application/json;charset=utf-8",  
          data: JSON.stringify(Emp),  
          dataType: "json",  
          success: function (response) {  
      
            alert(response);  
                           
         },  
      
         error: function (x, e) {  
             alert('Failed');  
             alert(x.responseText);  
             alert(x.status);  
      
         }  
      });  
        
    }       
        
    $(document).ready(function ()  
    {  
      
        $("#btnSave").click(function (e) {  
                  
           AddEmp();  
           e.preventDefault();  
      
        });  
      
    });  
    

    Now the entire default.aspx page will be as follows:

    <%@ Page Language="C#" AutoEventWireup="true" CodeBehind="Default.aspx.cs" Inherits="InsertingFormDataUsingWebAPI.Default" %>  
      
    <!DOCTYPE html PUBLIC "-//W3C//DTD XHTML 1.0 Transitional//EN" "http://www.w3.org/TR/xhtml1/DTD/xhtml1-transitional.dtd">  
      
    <html xmlns="http://www.w3.org/1999/xhtml">  
    <head id="Head1" runat="server">  
        <title>Article  by Vithal Wadje</title>  
        <script src="jquery-1.7.1.js" type="text/javascript"></script>  
          
        <script type="text/javascript">  
      
             
            function AddEmp() {  
                
                var Emp = {};  
                Emp.FirstName = $("#txtFirstName").val();  
                Emp.LastName = $("#txtLastName").val();           
                Emp.Company = $("#txtCompany").val();    
      
      
                $.ajax({  
                    url:"<%=Page.ResolveUrl("/api/Emp/AddEmployees")%>",   
                    type: "POST",  
                    contentType: "application/json;charset=utf-8",  
                    data: JSON.stringify(Emp),  
                    dataType: "json",  
                    success: function (response) {  
      
                        alert(response);           
      
                    },  
      
                    error: function (x, e) {  
                        alert('Failed');  
                        alert(x.responseText);  
                        alert(x.status);  
      
                    }  
                });   
            }       
      
            $(document).ready(function ()  
             {   
                $("#btnSave").click(function (e) {               
      
                    AddEmp();  
                    e.preventDefault();  
                });    
            });  
      
        </script>  
    </head>  
    <body style="background-color:Navy;color:White">  
        <form id="form1" runat="server">  
        <br /><br />  
        <table>  
            <tr>  
                <td>  
                    First Name  
                </td>  
                <td>  
                    <asp:TextBox runat="server" ID="txtFirstName" />  
                </td>  
            </tr>  
            <tr>  
                <td>  
                    Last Name  
                </td>  
                <td>  
                    <asp:TextBox runat="server" ID="txtLastName" />  
                </td>  
            </tr>  
            <tr>  
                <td>  
                    Company  
                </td>  
                <td>  
                    <asp:TextBox runat="server" ID="txtCompany" />  
                </td>  
            </tr>  
            <tr>  
                <td>  
                </td>  
                <td>  
                    <asp:Button Text="Save" runat="server" ID="btnSave" />  
                </td>  
            </tr>  
        </table>  
        <br />  
          
        </form>  
    </body>  
    </html>  
    
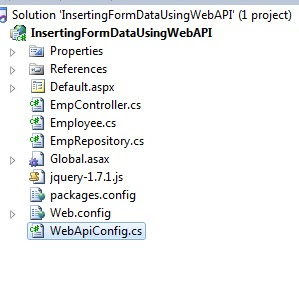
      Also we need to add a jQuery library reference so don't forget it to add it. Now the entire Solution Explorer will look as follows:


      Now run the application.


      Now enter some records into the preceding fields and click on the Save button. The following message will be shown.


      Now let us see into the database table, the added records will be shown as follows:


      Now you have seen how the records are inserted into the database using the ASP.Net Web API with Web Forms.

      Notes

      • For detailed code sample file i will upload soon.
      • Do a proper validation such as date input values when implementing.
      • Make the changes in the web.config file depending on your server details for the connection string.
      Summary

      You have learned here how to insert records into the database using the ASP.Net Web API with WebForms. I hope this article is useful for all readers. If you have a suggestion then please contact me.

      www.CodeNirvana.in

      Protected by Copyscape
      Copyright © Compilemode