Bind DropDownList Using JSON Data In ASP.NET MVC

In this article, we will learn how to bind the DropDownList using JSON data in ASP.NET MVC. Let's learn it step by step through creating a simple ASP.NET MVC application.

Step 1: Create an ASP.NET MVC application.

  1. "Start", then "All Programs" and select "Microsoft Visual Studio 2015".

  2. "File", then "New" and click "Project" then select "ASP.NET Web Application Template", then provide the Project a name as you wish and click on OK.

  3. Choose ASP.NET MVC empty application option and click on OK

Step 2: Add model class.

Right click on model folder of created ASP.NET  MVC application project and add class file named EmpModel.cs and create two classes as:

EmpModel.cs
using System.ComponentModel.DataAnnotations;  
  
namespace BindDropDownListUsingJSON.Models  
{  
    //Model property to the dropdownlist to get selected value  
    public class EmpModel  
    {  
        [Display(Name = "Select City")]  
        public string City { get; set; }  
    }  
    //to bind list of records to dropdownlist  
    public class DDLOptions  
    {  
       public int Id { get; set; }  
       public string CityName { get; set; }  
  
   }  
}  

Step 3: Add controller class.

Right click on Controller folder in the created ASP.NET MVC application, give the class name Home or as you wish as in the following:


Now after selecting controller template, click on Add button then the following window appears,


Specify the controller name and click on add button, Now open the HomeController.cs file and write the following code into the Home controller class as in the following:
using BindDropDownListUsingJSON.Models;  
using System.Collections.Generic;  
using System.Linq;  
using System.Web.Mvc;  
  
namespace BindDropDownListUsingJSON.Controllers  
{  
    public class HomeController : Controller  
    {  
        // GET: Home  
        public ActionResult Index()  
        {  
            return View();  
        }  
         
        //Return json list of cities  
        [HttpGet]  
        public JsonResult CityList()  
        {  
            List<DDLOptions> obj = new List<DDLOptions>()  
            {  
                new DDLOptions {Id=1, CityName="Latur" },  
                new DDLOptions {Id=2, CityName="Pune" },  
                new DDLOptions {Id=4, CityName="Mumbai"},  
                new DDLOptions {Id=5, CityName="New Delhi" }  
            }.ToList();  
  
            return Json(obj, JsonRequestBehavior.AllowGet);  
        }  
    }  
}  
In the above we have created two action methods. One returns a view named Index and another one will return a json result named CityList. Remember that instead of going to the database I have created a list of records and returned it as json. However you can bind this list from the database, but in this example assume that this list is coming from the database.

Step 4: Add View

Add strongly typed view named Index.cshtml from EmpModel class as:


After clicking on add button the view generated.

To call the CityList json action method, create the following jQuery Ajax function.
<script>  
      
    $(document).ready(function ()  
    {    //call the CityList json result method  
        $.getJSON("/Home/CityList", function (data)  
        {        
            $.each(data, function (i, data)  
            {      // bind the dropdown list using json result              
                 $('<option>',  
                    {  
                        value: data.Id,  
                        text: data.CityName  
                    }).html(data.CityName).appendTo("#City");  
                });  
        })  
        //Get the selected text on button click  
        $("#btnSave").click(function () {  
  
            var txt = $("#City option:selected").text();  
            
            // assign the selected value to span to   
            //show to the end user  
            $("#Spnmsg").text("Your Selected City is " + txt);  
  
            return false;  
  
        })  
  
    });  
</script> 
To work the above function properly we need the following jQuery file to be referenced at the top of the view or in layout page.
<script src="~/Scripts/jquery-1.10.2.min.js"></script>  
After adding necessary code, files and logic the Index.cshtml code will look like the following
@model BindDropDownListUsingJSON.Models.EmpModel  
@{  
    ViewBag.Title = "www.compilemode.com";  
}  
<script src="~/Scripts/jquery-1.10.2.min.js"></script>  
<script>  
      
    $(document).ready(function ()  
    {    //call the CityList json result method  
        $.getJSON("/Home/CityList", function (data)  
        {        
            $.each(data, function (i, data)  
            {      // bind the dropdown list using json result              
                 $('<option>',  
                    {  
                        value: data.Id,  
                        text: data.CityName  
                    }).html(data.CityName).appendTo("#City");  
                });  
        })  
        //Get the selected text on button click  
        $("#btnSave").click(function () {  
  
            var txt = $("#City option:selected").text();  
            
            // assign the selected value to span to   
            //show to the end user  
            $("#Spnmsg").text("Your Selected City is " + txt);  
  
            return false;  
  
        })  
  
    });  
</script>  
  
@using (Html.BeginForm())   
{  
    @Html.AntiForgeryToken()  
      
    <div class="form-horizontal">  
         
        <hr />  
        @Html.ValidationSummary(true, "", new { @class = "text-danger" })  
        <div class="form-group">  
            @Html.LabelFor(model => model.City, htmlAttributes: new { @class = "control-label col-md-2" })  
            <div class="col-md-12">  
                @Html.DropDownListFor(model => model.City, Enumerable.Empty<SelectListItem>(), new { htmlAttributes = new { @class = "form-control" } })  
        
                 
            </div>  
        </div>  
  
        <div class="form-group">  
            <div class="col-md-offset-2 col-md-10">  
                <input type="submit" value="Save" id="btnSave" class="btn btn-primary" />  
            </div>  
        </div>  
        <div class="form-group">  
            <div  class="col-md-offset-2 col-md-10 text-success">  
                <span id="Spnmsg"></span>  
               
            </div>  
        </div>  
    </div>  
}  

Step 5: Run the application.

After running the application the output will be as in the following screenshot:


In the preceding screenshot you have seen that drop down list records are populated from JSON data. Now select any city from drop down list records and click on save button, it will show the following output.


From all the above examples, I hope you have learned how to bind strongly typed DropDownList using JSON data in ASP.NET MVC .

Note:
  • For the complete code, please download the sample zip file.
  • You need to use the jQuery library.
Summary
I hope this article is useful for all readers. If you have a suggestion then please contact me.

DropDownList Using JSON Data In ASP.NET MVC

In this article, we will learn how to bind the DropDownList using JSON data in ASP.NET MVC. Let's learn it step by step through creating a simple ASP.NET MVC application.

Step 1: Create an MVC application.

  1. "Start", then "All Programs" and select "Microsoft Visual Studio 2015".

  2. "File", then "New" and click "Project" then select "ASP.NET Web Application Template", then provide the Project a name as you wish and click on OK.

  3. Choose ASP.NET MVC empty application option and click on OK

Step 2: Add model class.

Right click on model folder of created ASP.NET  MVC application project and add class file named EmpModel.cs and create two classes as:

EmpModel.cs
using System.ComponentModel.DataAnnotations;  
  
namespace BindDropDownListUsingJSON.Models  
{  
    //Model property to the dropdownlist to get selected value  
    public class EmpModel  
    {  
        [Display(Name = "Select City")]  
        public string City { get; set; }  
    }  
    //to bind list of records to dropdownlist  
    public class DDLOptions  
    {  
       public int Id { get; set; }  
       public string CityName { get; set; }  
  
   }  
}  

Step 3: Add controller class.

Right click on Controller folder in the created ASP.NET MVC application, give the class name Home or as you wish as in the following:


Now after selecting controller template, click on Add button then the following window appears,


Specify the controller name and click on add button, Now open the HomeController.cs file and write the following code into the Home controller class as in the following:
using BindDropDownListUsingJSON.Models;  
using System.Collections.Generic;  
using System.Linq;  
using System.Web.Mvc;  
  
namespace BindDropDownListUsingJSON.Controllers  
{  
    public class HomeController : Controller  
    {  
        // GET: Home  
        public ActionResult Index()  
        {  
            return View();  
        }  
         
        //Return json list of cities  
        [HttpGet]  
        public JsonResult CityList()  
        {  
            List<DDLOptions> obj = new List<DDLOptions>()  
            {  
                new DDLOptions {Id=1, CityName="Latur" },  
                new DDLOptions {Id=2, CityName="Pune" },  
                new DDLOptions {Id=4, CityName="Mumbai"},  
                new DDLOptions {Id=5, CityName="New Delhi" }  
            }.ToList();  
  
            return Json(obj, JsonRequestBehavior.AllowGet);  
        }  
    }  
}  
In the above we have created two action methods. One returns a view named Index and another one will return a json result named CityList. Remember that instead of going to the database I have created a list of records and returned it as json. However you can bind this list from the database, but in this example assume that this list is coming from the database.

Step 4: Add View

Add strongly typed view named Index.cshtml from EmpModel class as:


After clicking on add button the view generated.

To call the CityList json action method, create the following jQuery Ajax function.
<script>  
      
    $(document).ready(function ()  
    {    //call the CityList json result method  
        $.getJSON("/Home/CityList", function (data)  
        {        
            $.each(data, function (i, data)  
            {      // bind the dropdown list using json result              
                 $('<option>',  
                    {  
                        value: data.Id,  
                        text: data.CityName  
                    }).html(data.CityName).appendTo("#City");  
                });  
        })  
        //Get the selected text on button click  
        $("#btnSave").click(function () {  
  
            var txt = $("#City option:selected").text();  
            
            // assign the selected value to span to   
            //show to the end user  
            $("#Spnmsg").text("Your Selected City is " + txt);  
  
            return false;  
  
        })  
  
    });  
</script> 
To work the above function properly we need the following jQuery file to be referenced at the top of the view or in layout page.
<script src="~/Scripts/jquery-1.10.2.min.js"></script>  
After adding necessary code, files and logic the Index.cshtml code will look like the following
@model BindDropDownListUsingJSON.Models.EmpModel  
@{  
    ViewBag.Title = "www.compilemode.com";  
}  
<script src="~/Scripts/jquery-1.10.2.min.js"></script>  
<script>  
      
    $(document).ready(function ()  
    {    //call the CityList json result method  
        $.getJSON("/Home/CityList", function (data)  
        {        
            $.each(data, function (i, data)  
            {      // bind the dropdown list using json result              
                 $('<option>',  
                    {  
                        value: data.Id,  
                        text: data.CityName  
                    }).html(data.CityName).appendTo("#City");  
                });  
        })  
        //Get the selected text on button click  
        $("#btnSave").click(function () {  
  
            var txt = $("#City option:selected").text();  
            
            // assign the selected value to span to   
            //show to the end user  
            $("#Spnmsg").text("Your Selected City is " + txt);  
  
            return false;  
  
        })  
  
    });  
</script>  
  
@using (Html.BeginForm())   
{  
    @Html.AntiForgeryToken()  
      
    <div class="form-horizontal">  
         
        <hr />  
        @Html.ValidationSummary(true, "", new { @class = "text-danger" })  
        <div class="form-group">  
            @Html.LabelFor(model => model.City, htmlAttributes: new { @class = "control-label col-md-2" })  
            <div class="col-md-12">  
                @Html.DropDownListFor(model => model.City, Enumerable.Empty<SelectListItem>(), new { htmlAttributes = new { @class = "form-control" } })  
        
                 
            </div>  
        </div>  
  
        <div class="form-group">  
            <div class="col-md-offset-2 col-md-10">  
                <input type="submit" value="Save" id="btnSave" class="btn btn-primary" />  
            </div>  
        </div>  
        <div class="form-group">  
            <div  class="col-md-offset-2 col-md-10 text-success">  
                <span id="Spnmsg"></span>  
               
            </div>  
        </div>  
    </div>  
}  

Step 5: Run the application.

After running the application the output will be as in the following screenshot:


In the preceding screenshot you have seen that drop down list records are populated from JSON data. Now select any city from drop down list records and click on save button, it will show the following output.


From all the above examples, I hope you have learned how to bind strongly typed DropDownList using JSON data in ASP.NET MVC .

Note:
  • For the complete code, please download the sample zip file.
  • You need to use the jQuery library.
Summary
I hope this article is useful for all readers. If you have a suggestion then please contact me.

Display JSON Data From Controller To View In ASP.NET MVC

There are many ways to display data from controller to view and to  make easier to understand students as well as beginners I have decided to write series of articles on ways to display data from controller to view , hence in this first article of series we will learn how to display JSON (JavaScript Object Notation ) data from controller to view in ASP.NET MVC.
Let's start step by step by creating one simple ASP.NET MVC application.

Step 1 : Create MVC application
  1. "Start", then "All Programs" and select "Microsoft Visual Studio 2015".
  2. "File", then "New" and click "Project..." then select "ASP.NET Web Application Template", then provide the Project a name as you wish and click on OK. 
  3. Choose MVC empty application option and click on OK
Step 2 : Create Model Class
Right click on Model folder in the created MVC application ,give the class name Employee or as you wish and click on OK .
Employee.cs
public class Employee
    {
        public int Id { get; set; }
        public string Name { get; set; }
        public string City { get; set; }
        public string  Address { get; set; }
    }
Step 3 : Add controller class
Right click on Controller folder in the created MVC application ,give the class name Home or as you 
and click on OK
HomeControlle.cs
public class HomeController : Controller
    {
        // GET: Home
        public ActionResult Index()
        {
        return View();
        }
        [HttpGet]
        public JsonResult EmpDetails()
        {
        //Creating List
            List<Employee> ObjEmp = new List<Employee>()
            {
        //Adding records to list
        new Employee {Id=1,Name="Vithal Wadje",City="Latur",Address="Kabansangvi" },
        new Employee {Id=2,Name="Sudhir Wadje",City="Mumbai",Address="Kurla" }
            };
        //return list as Json
        return Json(ObjEmp, JsonRequestBehavior.AllowGet);
        }
    }
In the above controller class JsonResult method EmpDetails  we have added the records into the Generic list. and returning it as JSON  to avoid database query for same result.
To work with JQuery we need a following JQuery library
<script src="~/Scripts/jquery-1.10.2.min.js"></script>
The preceding JQuery library file version may be different that is lower or higher
Step 4 : Add Partial view
Right click on Home folder inside the View folder in the created MVC application as

Give the name EmpDetails and click on Add button and write the following code.
<script src="~/Scripts/jquery-1.10.2.min.js"></script>
<script>
    $(document).ready(function () {
        //Call EmpDetails jsonResult Method
        $.getJSON("Home/EmpDetails",
        function (json) {
        var tr;
        //Append each row to html table
        for (var i = 0; i < json.length; i++) {
                tr = $('<tr/>');
                tr.append("<td>" + json[i].Id + "</td>");
                tr.append("<td>" + json[i].Name + "</td>");
                tr.append("<td>" + json[i].City + "</td>");
                tr.append("<td>" + json[i].Address + "</td>");
                $('table').append(tr);
            }
        });
    });
</script>
<table class="table table-bordered table-condensed table-hover table-striped">
        <thead>
        <tr>
        <th>Id</th>
        <th>Name</th>
        <th>City</th>
        <th>Address</th>
        </tr>
        </thead>
        <tbody></tbody>
</table>

Step 5 : Call partial view EmpDetails in Main Index view
Now call the partial view EmpDetails in Main Index view as using following code
@{
    ViewBag.Title = "www.compilemode.com";
}
<div style="margin-top:20px">
@Html.Partial("EmpDetails");
</div>
Step 6 : Run the application


I hope from preceding examples , You have learned how to display JSON data from controller to view in ASP.NET MVC.
Summary
I hope this tutorial is useful for all readers. If you have any suggestion then please comment below to the article.

AutoComplete TextBox In ASP.NET MVC Using Json Data

In many application we need to allow user to select data from master details such city list , country list or any other , Usually dropdownlist is used to allow to choose details from multiple list of records but if records are huge this drop down list approach will be fail So to allow user to pop up the list as per their search term then Autocomplete textbox is used which is proper approach . In this article we will implement auto complete textbox with the help of jQuery UI library from database with json data. So let us implement this requirement step by step,
  1. "Start", then "All Programs" and select "Microsoft Visual Studio 2015".
  2. "File", then "New" and click "Project", then select "ASP.NET Web Application Template", then provide the Project a name as you wish and click on OK.
  3. Choose MVC empty application option and click on OK
Step 2: Add model class.

Right click on Model folder in the created MVC application and add class named CityModel and right the following line of code,

CityModel.cs
public class City  
  {  
      public int Id { get; set; }  
      public string Name { get; set; }  
  
  }  
Step 3: Add user and admin controller

Right click on Controller folder in the created MVC application and add the controller class as:

Now after selecting controller template, click on add button then the following window appears,


Specify the controller name and click on add button, Now open the HomeController.cs file and write the following code into the Home controller class to bind and create the generic list from model class as in the following,

HomeController.cs
using System.Collections.Generic;  
using System.Linq;  
using System.Web.Mvc;  
using AutoCompleteInMVCJson.Models;  
namespace AutoCompleteInMVCJson.Controllers  
{  
    public class HomeController : Controller  
    {  
        // GET: Home  
        [HttpGet]  
        public ActionResult Index()  
        {  
            return View();  
        }  
        [HttpPost]  
        public JsonResult Index(string Prefix)  
        {  
            //Note : you can bind same list from database  
            List<City> ObjList = new List<City>()  
            {  
  
                new City {Id=1,Name="Latur" },  
                new City {Id=2,Name="Mumbai" },  
                new City {Id=3,Name="Pune" },  
                new City {Id=4,Name="Delhi" },  
                new City {Id=5,Name="Dehradun" },  
                new City {Id=6,Name="Noida" },  
                new City {Id=7,Name="New Delhi" }  
  
        };  
            //Searching records from list using LINQ query  
            var CityName = (from N in ObjList  
                            where N.Name.StartsWith(Prefix)  
                          select new { N.Name });  
            return Json(CityName, JsonRequestBehavior.AllowGet);  
        }  
    }  
}  
In the above code, instead of going to database for records we are creating the generic list from model class and we will fetch records from above generic list.

Step 4:
Reference jQuery UI css and js library reference as there are many ways to add the reference of jQuery library into the our project. The following are some methods:
  • Using NuGet package manager , you can install library and reference into the project
  • Use CDN library provided by Microsoft, jQuery, Google or any other which requires active internet connection.
  • Download jQuery files from jQuery official website and reference into the project.
In this example we will use jQuery CDN library.

Step 5: Create jQuery Ajax function to call controller JSON action method and invoke autocomplete function,
$(document).ready(function () {  
       $("#CityName").autocomplete({  
           source: function(request,response) {  
               $.ajax({  
                   url: "/Home/Index",  
                   type: "POST",  
                   dataType: "json",  
                   data: { Prefix: request.term },  
                   success: function (data) {  
                       response($.map(data, function (item) {  
                           return { label: item.Name, value: item.Name };  
                       }))  
  
                   }  
               })  
           },  
           messages: {  
               noResults: "", results: ""  
           }  
       });  
   })  
To work above function don't forget to add the reference of the following jQuery CDN library as,
<link rel="stylesheet" href="//code.jquery.com/ui/1.11.4/themes/smoothness/jquery-ui.css">  
<script src="//code.jquery.com/jquery-1.10.2.js"></script>  
<script src="//code.jquery.com/ui/1.11.4/jquery-ui.js"></script> 
Step 6:
Add view named index and put above json function into the view. After adding code necessary files and logic the Index.cshtml will look like the following,

Index.cshtml

@model AutoCompleteInMVCJson.Models.CityModel  
@{  
    ViewBag.Title = "www.compilemode.com";  
}  
<link rel="stylesheet" href="//code.jquery.com/ui/1.11.4/themes/smoothness/jquery-ui.css">  
<script src="//code.jquery.com/jquery-1.10.2.js"></script>  
<script src="//code.jquery.com/ui/1.11.4/jquery-ui.js"></script>  
<script type="text/javascript">  
    $(document).ready(function () {  
        $("#CityName").autocomplete({  
            source: function (request, response) {  
                $.ajax({  
                    url: "/Home/Index",  
                    type: "POST",  
                    dataType: "json",  
                    data: { Prefix: request.term },  
                    success: function (data) {  
                        response($.map(data, function (item) {  
                            return { label: item.Name, value: item.Name };  
                        }))  
  
                    }  
                })  
            },  
            messages: {  
                noResults: "", results: ""  
            }  
        });  
    })  
</script>  
@using (Html.BeginForm())  
{  
    @Html.AntiForgeryToken()  
  
    <div class="form-horizontal">  
  
        <hr />  
  
        <div class="form-group">  
  
            <div class="col-md-12">  
                @Html.EditorFor(model => model.CityName, new { htmlAttributes = new { @class = "form-control" } })  
  
            </div>  
        </div>  
  
    </div>  
}  
Now run the application and type any word then it will auto populate the records which exactly start with first word as in the following screenshot,
 
If you want to auto populate the records which contain any typed alphabet,then just change the LINQ query as contain. Now type any word it will search as follows,
 
From all the above examples, I hope you learned how to create the auto complete textbox using jQuery UI in ASP.NET MVC.

Note:
  • For the detailed code, please download the sample zip file.
  • Perform changes in Web.config file as per your server location.
  • You need to use the jQuery library.
Download Sample Code :  AutoCompleteInMVCJson.zip
    Summary

    For all the examples above, we learned how to use jQuery UI to create auto complete textbox in ASP.NET MVC. I hope this article is useful for all readers. If you have a suggestion then please contact me. 

    Display Data From DataBase in ASP.NET Using Web API And jQuey Json

    I have often read the common question in forum posts as how to insert the ASP.Net form data into a database and display it using the Web API. So based on the this requirement, I have decided to write this article. Let us start creating an application so beginners can also understand.

    Step 1 : Create Table and Stored Procedure

    First create the table named Employee using the following script:

    CREATE TABLE [dbo].[Employee](    
        [Id] [int] IDENTITY(1,1) NOT NULL,    
        [FirstName] [varchar](50) NULL,    
        [LastName] [varchar](50) NULL,    
        [Company] [varchar](50) NULL,    
     CONSTRAINT [PK_Employee] PRIMARY KEY CLUSTERED     
    (    
        [Id] ASC    
    )WITH (PAD_INDEX = OFF, STATISTICS_NORECOMPUTE = OFF, IGNORE_DUP_KEY = OFF, ALLOW_ROW_LOCKS = ON, ALLOW_PAGE_LOCKS = ON) ON [PRIMARY]    
    ) ON [PRIMARY]   
    

    Now create a Stored Procedure to insert the data as:

    Create Procedure [dbo].[InsertData]    
    (    
    @FName varchar(50),    
    @Lname Varchar(50),    
    @Compnay varchar(50)    
        
    )    
    as    
    begin    
        
    INSERT INTO [dbo].[Employee]    
               ([FirstName]    
               ,[LastName]    
               ,[Company])    
         VALUES    
               (    
               @FName,    
               @Lname,    
               @Compnay    
              )    
    End 
    

    Step 2 : Create Web Application

    Now Let us create the sample web application as follows:
    1. "Start" -> "All Programs" -> "Microsoft Visual Studio 2010".
    2. "File" -> "New Project" -> "C#" -> "Empty Project" (to avoid adding a master page).
    3. Provide the website a name such as "DisplayingFormDataUsingWebAPI" or another as you wish and specify the location.
    4. Then right-click on the Solution Explorer -> "Add New Item" -> Add Web Form.
    5. Drag and drop three text boxes and one Button onto the <form> section of the Default.aspx page.
    Now the default.aspx page source code will be as follows.

    <%@ Page Language="C#" AutoEventWireup="true" CodeBehind="Default.aspx.cs" Inherits="InsertingFormDataUsingWebAPI.Default" %>      
              
        <!DOCTYPE html PUBLIC "-//W3C//DTD XHTML 1.0 Transitional//EN" "http://www.w3.org/TR/xhtml1/DTD/xhtml1-transitional.dtd">      
              
        <html xmlns="http://www.w3.org/1999/xhtml">      
        <head id="Head1" runat="server">      
            <title>Article  by Vithal Wadje</title>      
                 
        </head>      
        <body style="background-color:Navy;color:White">      
            <form id="form1" runat="server">      
            <br /><br />      
            <table>      
                <tr>      
                    <td>      
                        First Name      
                    </td>      
                    <td>      
                        <asp:TextBox runat="server" ID="txtFirstName" />      
                    </td>      
                </tr>      
                <tr>      
                    <td>      
                        Last Name      
                    </td>      
                    <td>      
                        <asp:TextBox runat="server" ID="txtLastName" />      
                    </td>      
                </tr>      
                <tr>      
                    <td>      
                        Company      
                    </td>      
                    <td>      
                        <asp:TextBox runat="server" ID="txtCompany" />      
                    </td>      
                </tr>      
                <tr>      
                    <td>      
                    </td>      
                    <td>      
                        <asp:Button Text="Save" runat="server" ID="btnSave" />      
                    </td>      
                </tr>      
            </table>      
            <br />      
                  
            </form>      
        </body>      
        </html>  
    

    Step 3 : Create Property Class

    We have a .aspx Web form to insert the records. Now create the Property class named Employee class as in the following:

        public class Employee     
        {    
           public string FirstName { get; set; }    
           public string LastName { get; set; }    
           public string Company { get; set; }    
          
        }   
    

    Step 4: Add Web API Controller Class

    We created the preceding properties as in our table structure to insert the preceding employee details into the database. Now let us add a web API controller class into the web application by right-clicking on the project in the Solution Explorer and rename it EmpController with controller suffix.

    Step 5: Create Repository Class to add and view records

    Now add the following method into the Repository Class named AddEmployee and GetAllEmp that does all the data access related activities:

    public IEnumerable<Employee> GetAllEmp()  
         {  
             connection();  
       
           com = new SqlCommand("select *from Employee", con);  
           com.CommandType = CommandType.Text;  
             SqlDataAdapter da = new SqlDataAdapter(com);  
             DataTable dt = new DataTable();  
             con.Open();  
             da.Fill(dt);  
             con.Close();  
      
             foreach (DataRow row in dt.Rows)  
             {  
                 yield return new Employee  
                 {  
                     Id = Convert.ToInt32(row["Id"]),  
                     FirstName = Convert.ToString(row["FirstName"]),  
                     LastName = Convert.ToString(row["LastName"]),  
                     Company = Convert.ToString(row["Company"]),  
      
                 };  
             }  
      
         }  
         public string AddEmployees(Employee Emp)  
         {  
             connection();  
             com = new SqlCommand("InsertData", con);  
             com.CommandType = CommandType.StoredProcedure;  
             com.Parameters.AddWithValue("@FName", Emp.FirstName);  
             com.Parameters.AddWithValue("@Lname", Emp.LastName);  
             com.Parameters.AddWithValue("@Compnay", Emp.Company);  
             con.Open();  
             int i = com.ExecuteNonQuery();  
             con.Close();  
           
             if (i >= 1)  
             {  
                 return "New Employee Added Successfully"; 
             }  
             else  
             {  
                 return "Employee Not Added"; 
             }         
         }
    

    The entire EmpRepository class file will be as follows:

        using System;  
        using System.Collections.Generic;  
        using System.Linq;  
        using System.Web;  
        using System.Data.SqlClient;  
        using System.Configuration;  
        using System.Data;  
          
        namespace DisplayingFormDataUsingWebAPI  
        {  
            public class EmpRepository  
            {  
          
                private SqlConnection con;  
                private SqlCommand com;  
                
                private void connection()  
                {  
                    string constr = ConfigurationManager.ConnectionStrings["getconn"].ToString();  
                    con = new SqlConnection(constr);  
          
          
                }  
                public IEnumerable<Employee> GetAllEmp()  
                {  
                    connection();      
                  com = new SqlCommand("select *from Employee", con);  
                  com.CommandType = CommandType.Text;  
                    SqlDataAdapter da = new SqlDataAdapter(com);  
                    DataTable dt = new DataTable();  
                    con.Open();  
                    da.Fill(dt);  
                    con.Close();  
          
                    foreach (DataRow row in dt.Rows)  
                    {  
                        yield return new Employee  
                        {  
                            Id = Convert.ToInt32(row["Id"]),  
                            FirstName = Convert.ToString(row["FirstName"]),  
                            LastName = Convert.ToString(row["LastName"]),  
                            Company = Convert.ToString(row["Company"]),  
          
                        };  
                    }  
          
                }  
                public string AddEmployees(Employee Emp)  
                {  
                    connection();  
                    com = new SqlCommand("InsertData", con);  
                    com.CommandType = CommandType.StoredProcedure;  
                    com.Parameters.AddWithValue("@FName", Emp.FirstName);  
                    com.Parameters.AddWithValue("@Lname", Emp.LastName);  
                    com.Parameters.AddWithValue("@Compnay", Emp.Company);  
                    con.Open();  
                    int i = com.ExecuteNonQuery();  
                    con.Close();  
                  
                    if (i >= 1)  
                    {  
                        return "New Employee Added Successfully";  
          
                    }  
                    else  
                    {  
                        return "Employee Not Added";  
          
                    }            
                }  
            }  
        } 
    

    Step 6: Create Post and Get method

    Create a Post and Get method in the ASP.Net Web API Controller Class. Open the EmpController class that we created, delete the existing methods and create the AddEmployees and GetAllEmp method and call the EmpRepository class method as in the following:

        //creating the object of EmpRepository class  
              static EmpRepository repository = new EmpRepository();  
          
              public IEnumerable<Employee> GetAllEmp()  
              {  
                  var users = repository.GetAllEmp();  
                  return users;  
              }  
              public string AddEmployees(Employee Emp)  
              {  
                  //calling EmpRepository Class Method and storing Repsonse   
                  var response = repository.AddEmployees(Emp);  
                  return response;  
          
              } 
    

    You have seen that the preceding EmpController class is inherited from the ApiController class and we have created the method AddEmployee that calls the EmpRepository class method named AddEmployees. The entire EmpController class will be as follows:

        using System;  
        using System.Collections.Generic;  
        using System.Linq;  
        using System.Net;  
        using System.Net.Http;  
        using System.Web.Http;  
          
        namespace DisplayingFormDataUsingWebAPI  
        {  
            public class EmpController : ApiController  
            {  
          
                //creating the object of EmpRepository class  
                static EmpRepository repository = new EmpRepository();  
          
                public IEnumerable<Employee> GetAllEmp()  
                {  
                    var users = repository.GetAllEmp();  
                    return users;  
                }  
                public string AddEmployees(Employee Emp)  
                {  
                    //calling EmpRepository Class Method and storing Repsonse   
                    var response = repository.AddEmployees(Emp);  
                    return response;  
          
                }  
          
            }  
        } 
    

    Step 7: Call ASP.Net Web API Controller method

    Call the ASP.Net Web API Controller method from the .aspx page using JSON. Now we need to call the Web API controller method from the .aspx page. To do this we need to create a JSON method using jQuery as in the following:

        <script type="text/javascript">  
             function GetAllEmp() {  
                   $.getJSON("api/Emp", function (data) {  
                       $('#bindemp').empty();  
                       $.each(data, function (key, val) {  
                         
                           var row = "<tr><td>" + val.Id + "</td> <td></td>  <td>" + val.FirstName + "  " + val.LastName + "</td> <td></td> <td>" + val.Company +  
                               "</td></tr>";  
          
                           $(row).appendTo($('#bindemp'));  
          
                       });  
                   });  
               }        
               function AddEmp() {  
                   
                   var Emp = {};  
                   Emp.FirstName = $("#txtFirstName").val();  
                   Emp.LastName = $("#txtLastName").val();           
                   Emp.Company = $("#txtCompany").val();  
          
                   $.ajax({  
                       url:"<%=Page.ResolveUrl("/api/Emp/AddEmployees")%>",   
                       type: "POST",  
                       contentType: "application/json;charset=utf-8",  
                       data: JSON.stringify(Emp),  
                       dataType: "json",  
                       success: function (response) {  
          
                           alert(response);  
                        GetAllEmp();
                       },  
          
                       error: function (x, e) {  
                           alert('Failed');  
                           alert(x.responseText);  
                           alert(x.status);  
          
                       }  
                   });  
               }
               $(document).ready(function ()  
                {  
          
                  GetAllEmp();  
          
                   $("#btnSave").click(function (e) {
                       AddEmp();  
                       e.preventDefault();
                   });
               });  
          
           </script> 


    Now the entire default.aspx page will be as follows:


        <%@ Page Language="C#" AutoEventWireup="true" CodeBehind="Default.aspx.cs" Inherits="DisplayingFormDataUsingWebAPI.Default" %>  
          
        <!DOCTYPE html PUBLIC "-//W3C//DTD XHTML 1.0 Transitional//EN" "http://www.w3.org/TR/xhtml1/DTD/xhtml1-transitional.dtd">  
          
        <html xmlns="http://www.w3.org/1999/xhtml">  
        <head id="Head1" runat="server">  
            <title>Article  by Vithal Wadje</title>  
            <script src="jquery-1.7.1.js" type="text/javascript"></script>  
              
            <script type="text/javascript">  
              function GetAllEmp() {  
                    $.getJSON("api/Emp", function (data) {  
                        $('#bindemp').empty();  
                        $.each(data, function (key, val) {  
                          
                            var row = "<tr><td>" + val.Id + "</td> <td></td>  <td>" + val.FirstName + "  " + val.LastName + "</td> <td></td> <td>" + val.Company +  
                                "</td></tr>";  
          
                            $(row).appendTo($('#bindemp'));  
          
                        });  
                    });  
                }  
                 
                function AddEmp() {  
                    
                    var Emp = {};  
                    Emp.FirstName = $("#txtFirstName").val();  
                    Emp.LastName = $("#txtLastName").val();           
                    Emp.Company = $("#txtCompany").val();  
          
                    $.ajax({  
                        url:"<%=Page.ResolveUrl("/api/Emp/AddEmployees")%>",   
                        type: "POST",  
                        contentType: "application/json;charset=utf-8",  
                        data: JSON.stringify(Emp),  
                        dataType: "json",  
                        success: function (response) {  
          
                            alert(response);  
                         GetAllEmp();       
          
                        },  
                        error: function (x, e) {  
                            alert('Failed');  
                            alert(x.responseText);  
                            alert(x.status);  
                        }  
                    });
          
                }
          
                $(document).ready(function ()  
                 {
                   GetAllEmp();
                    $("#btnSave").click(function (e) {      
          
                        AddEmp();  
                        e.preventDefault();
                    });
                });
            </script>  
        </head>  
        <body style="background-color:navy;color:White">  
            <form id="form1" runat="server">  
            <br /><br />  
            <table>  
                <tr>  
                    <td>  
                        First Name  
                    </td>  
                    <td>  
                        <asp:TextBox runat="server" ID="txtFirstName" />  
                    </td>  
                </tr>  
                <tr>  
                    <td>  
                        Last Name  
                    </td>  
                    <td>  
                        <asp:TextBox runat="server" ID="txtLastName" />  
                    </td>  
                </tr>  
                <tr>  
                    <td>  
                        Company  
                    </td>  
                    <td>  
                        <asp:TextBox runat="server" ID="txtCompany" />  
                    </td>  
                </tr>  
                <tr>  
                    <td>  
                    </td>  
                    <td>  
                        <asp:Button Text="Save" runat="server" ID="btnSave" />  
                    </td>  
                </tr>  
                </table>  
                <br />  
                <table>  
                
                <thead>  
                    <tr>  
                        <td>  
                            Id  
                        </td>  
                       <td></td>  
                       
                        <td>  
                          Name  
                        </td>  
                         <td></td>  
                        <td>  
                            Company  
                        </td>  
                    </tr>  
                </thead>  
               
                <tbody id="bindemp">  
                </tbody>  
            </table>  
            
            </form>  
        </body>  
        </html> 
    

    Now run the application, the UI will be as follows:


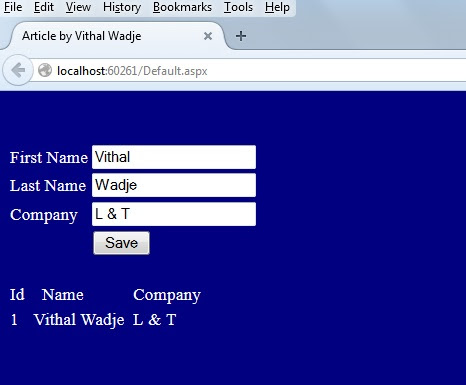
    Now enter some records into the preceding fields and click on the Save button. Then the following screen shows the added records.


    Now add another record.


    Now you have seen how the insertion of records into the database and display it using Web API with Web Forms works.

    Notes

    • Do a proper validation such as date input values when implementing.
    • Make the changes in the web.config file depending on your server details for the connection string.
    Summary

    You have learned here how to insert records into the database and display it using the ASP.Net Web API with Web Forms. I hope this article is useful for all readers. If you have a suggestion then please contact me.

    www.CodeNirvana.in

    Protected by Copyscape
    Copyright © Compilemode